Hướng dẫn bắt đầu nhanh - LimeSurvey 2.50+
From LimeSurvey Manual
Giới thiệu - LimeSurvey là gì?
LimeSurvey là một ứng dụng khảo sát trực tuyến mã nguồn mở và miễn phí được viết bằng PHP và được phân phối theo licenses/gpl-2.0.html Giấy phép Công cộng GNU 2. Phần mềm cho phép người dùng phát triển và xuất bản các khảo sát trực tuyến, thu thập phản hồi, tạo số liệu thống kê và xuất dữ liệu kết quả sang các ứng dụng khác. Bạn có thể cài đặt LimeSurvey trên máy chủ của riêng mình (LimeSurvey CE) hoặc bạn có thể trực tiếp bắt đầu sử dụng nó thông qua một trong những dịch vụ lưu trữ của chúng tôi (LimeSurvey Pro).
Hướng dẫn bắt đầu sau đây dựa trên việc sử dụng LimeSurvey Pro. Để cài đặt LimeSurvey trên máy chủ của riêng bạn, hãy xem phần cài đặt của chúng tôi từ hướng dẫn sử dụng LimeSurvey.
Tạo tài khoản LimeSurvey miễn phí
LimeSurvey cho phép mọi người dùng tạo một tài khoản miễn phí để kiểm tra các tính năng và chức năng cốt lõi của tài khoản đó. Để dùng thử, hãy di chuột qua Phiên bản & Giá nằm trên thanh công cụ trên cùng của trang web LimeSurvey và tìm Phiên bản & Giá nút nằm trong tab LimeSurvey Pro:

Bốn tùy chọn sẽ xuất hiện: miễn phí', cơ bản, chuyên gia và doanh nghiệp. Bấm vào nút Đăng ký ngay từ hộp tùy chọn MIỄN PHÍ:
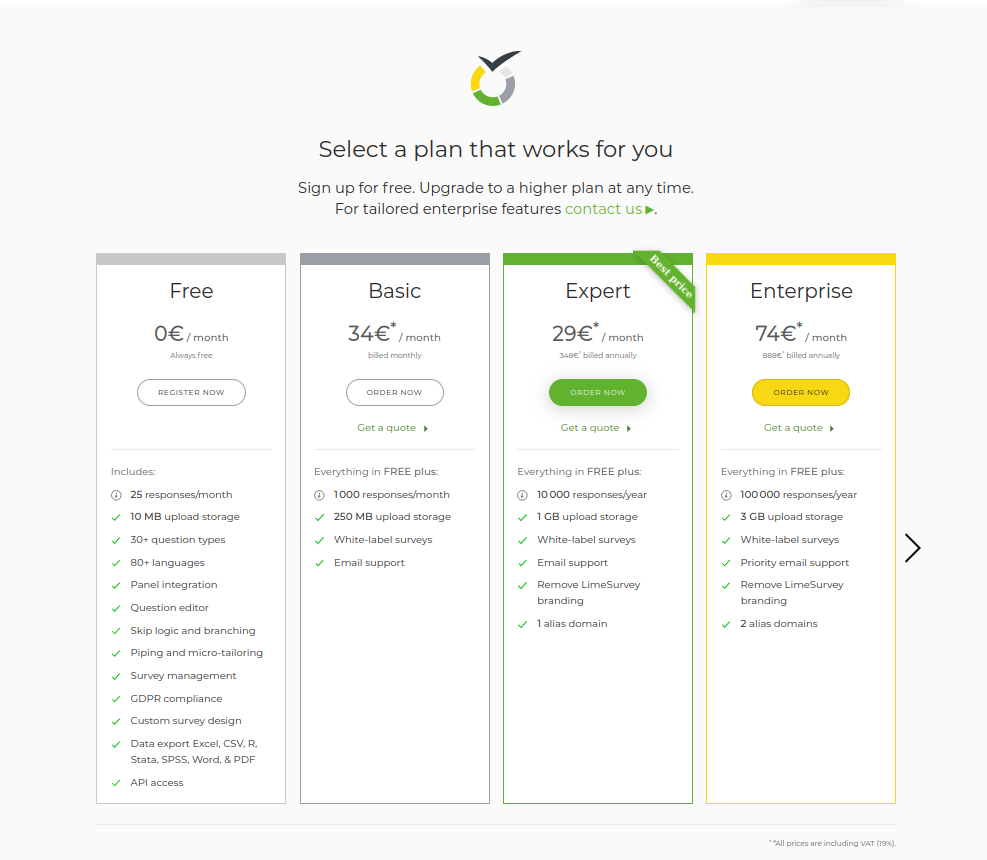
Bước tiếp theo bao gồm điền vào các trường sau:
- Tên người dùng: tên người dùng tài khoản của bạn cũng sẽ được sử dụng để truy cập vào cài đặt LimeSurvey của bạn;
- Email: email, liên kết kích hoạt sẽ được gửi đến;
- Mật khẩu: mật khẩu tài khoản của bạn cũng sẽ được sử dụng để truy cập cài đặt LimeSurvey của bạn.
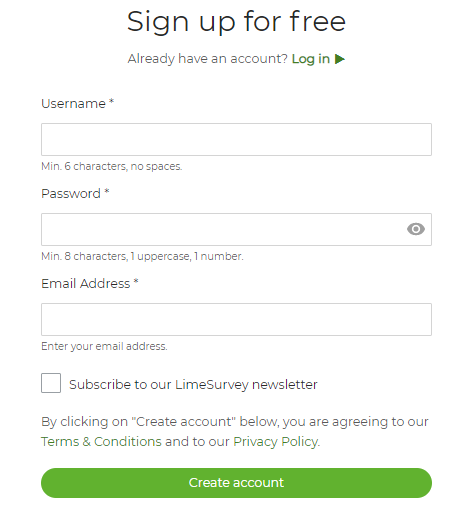
Khi bạn di chuột qua từng trường, các hộp văn bản sẽ bật lên với thông tin chi tiết hơn về từng trường. Tùy chọn, bạn cũng có thể đăng ký nhận bản tin LimeSurvey để nhận trợ giúp, mẹo & thủ thuật, giảm giá dịch vụ và tin tức mới nhất.
Để quá trình đăng ký nhanh hơn, LimeSurvey cho phép mỗi người dùng đăng ký thông qua tài khoản Twitter, Gmail hoặc GitHub của riêng họ. LimeSurvey sẽ thu thập thông tin cơ bản được yêu cầu từ nguồn bạn đã chọn.
Sau khi tạo tài khoản LimeSurvey bằng cách nhấp vào nút ĐĂNG KÝ, bạn sẽ nhận được email từ chúng tôi. Email này chứa liên kết kích hoạt tài khoản mà bạn nên nhấp vào để truy cập vào tài khoản mới tạo của mình. Sau khi nhấp vào, bạn sẽ được chuyển hướng đến trang web LimeSurvey, tự động đăng nhập vào tài khoản LimeSurvey của bạn.
Để truy cập liên kết khảo sát của bạn, trước tiên bạn phải tạo một bản cài đặt. Nhấp vào tên người dùng của bạn từ thanh công cụ chính, sau đó đi tới hồ sơ LimeSurvey của bạn :

Chọn Cài đặt từ Menu Hồ sơ nằm ở bên trái màn hình và tạo cài đặt:
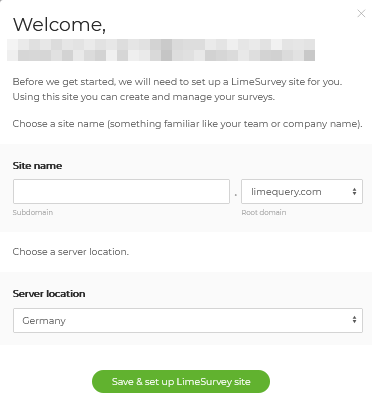
Bạn sẽ được yêu cầu:
- nhập Tên miền (liên kết URL của bảng câu hỏi);
- chọn vị trí Máy chủ – bạn có thể chọn một trong bốn vị trí máy chủ phù hợp với hầu hết nhu cầu của bạn .
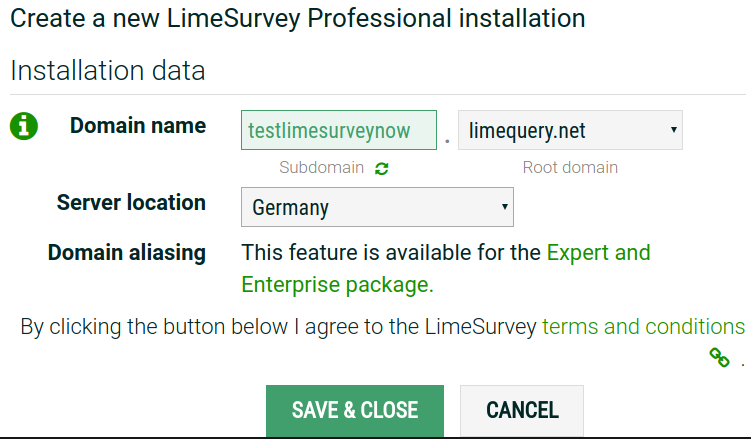
Khi các trường liên quan đến tên miền được hoàn thành và lưu lại, quá trình cài đặt sẽ bắt đầu. Việc này sẽ mất tới 10 giây. Trang cài đặt cài đặt sẽ trông như thế này:
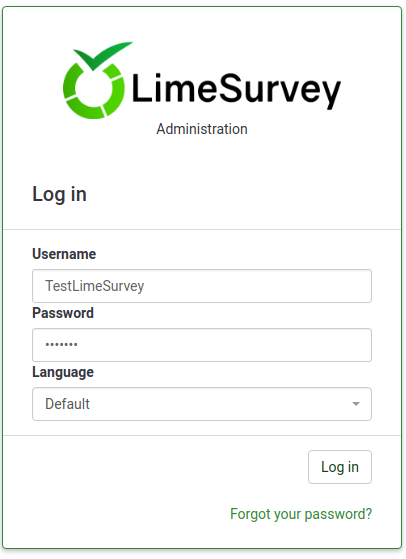
Bây giờ bạn có thể truy cập máy chủ của mình bằng cách nhấp vào URL quản trị. Để đăng nhập vào bản cài đặt LimeSurvey của bạn, hãy sử dụng thông tin đăng nhập LimeSurvey.org của bạn:
Bắt đầu sử dụng LimeSurvey
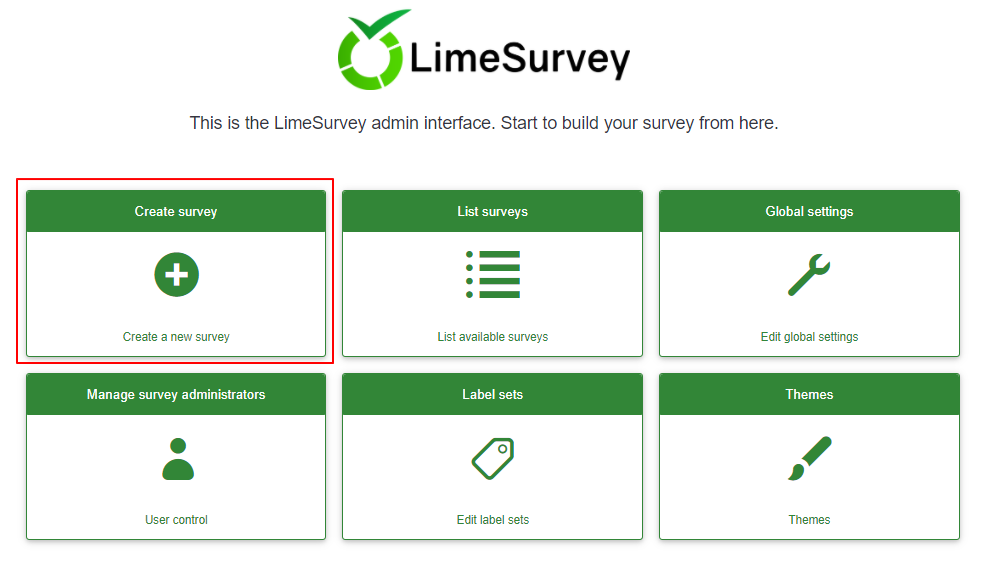
Sau khi đăng nhập, bạn sẽ thấy mình đang ở trên trang chủ của quá trình cài đặt LimeSurvey. Nó chứa một thanh công cụ nằm ở phần trên bên phải của cửa sổ và một bộ hộp, mỗi hộp tương ứng với sáu phím tắt chức năng LimeSurvey, nằm ở giữa trang chủ.
Thanh công cụ chứa các tùy chọn sau:
- Cấu hình: Sau khi được chọn, một hộp thoại sẽ hiển thị từ nơi bạn có thể quản lý cài đặt LimeSurvey của mình.
- Cài đặt: Trong tab này, bạn có thể tìm thấy các tùy chọn có thể trợ giúp bạn tùy chỉnh cài đặt LimeSurvey của mình.
- Cài đặt trang chủ: Người dùng có thể sử dụng tùy chọn này để điều chỉnh cài đặt của trang chủ theo nhu cầu của họ;
- Cài đặt chung:' ' Những thay đổi được thực hiện ở đây ảnh hưởng đến toàn bộ quá trình cài đặt LimeSurvey, cũng ảnh hưởng đến cài đặt của người dùng không phải quản trị viên cấp cao cho tất cả người dùng;
- Trình quản lý plugin: Nó cho phép mọi người dùng kích hoạt một loạt plugin được hỗ trợ bởi nhóm LimeSurvey. Các plugin mới cũng có thể được thêm vào cài đặt của bạn.
- Người dùng: Trong tab này, bạn có thể tìm thấy các tùy chọn liên quan đến quản lý người dùng và người tham gia khảo sát.
- Quản lý khảo sát quản trị viên: Người dùng quản trị mới có thể được thêm từ đây;
- Tạo/chỉnh sửa nhóm người dùng: Chức năng này nhằm mục đích nhóm người dùng quản trị thành các nhóm riêng lẻ;
- Central cơ sở dữ liệu người tham gia: Nó cho phép mọi quản trị viên lưu trữ thông tin của người tham gia vào một bảng trung tâm độc lập với bất kỳ bảng mã thông báo nào.
- Cài đặt nâng cao: Nó bao gồm các tùy chọn không phải là người dùng hoặc cài đặt -có liên quan. Chúng có thể được sử dụng để nâng cao quá trình cài đặt LimeSurvey của bạn.
- Themes: Nếu bạn muốn thêm/chỉnh sửa/xóa mẫu, hãy truy cập tùy chọn này. Các mẫu cho phép kiểm soát giao diện của các trang khảo sát của bạn;
- Quản lý bộ nhãn: Bộ nhãn về cơ bản là các mẫu danh sách trong đó mỗi danh sách có một bộ mã có nhãn và có thể sử dụng được trong hầu hết các loại câu hỏi dưới dạng câu trả lời hoặc câu hỏi phụ;
- Kiểm tra tính toàn vẹn dữ liệu: Nó kiểm tra tính nhất quán và tính dư thừa của dữ liệu;
- Sao lưu toàn bộ cơ sở dữ liệu: Nó được sử dụng để sao lưu dữ liệu LimeSurvey khi các nâng cấp LimeSurvey quan trọng được thực hiện hoặc khi bạn di chuyển cài đặt LimeSurvey sang một máy chủ khác;
- ComfortUpdate: Đây là một công cụ được sử dụng để dễ dàng cập nhật cài đặt LimeSurvey từ máy chủ của bạn trình duyệt web chỉ với vài cú click chuột (thay vì thực hiện cài đặt lại LimeSurvey thủ công).
- Cài đặt: Trong tab này, bạn có thể tìm thấy các tùy chọn có thể trợ giúp bạn tùy chỉnh cài đặt LimeSurvey của mình.
- Surveys: Một cuộc khảo sát bao gồm thông qua các cơ sở dữ liệu được kết nối với nhau khác nhau: ngôn ngữ, nhóm câu hỏi, câu hỏi, thuộc tính câu hỏi, câu trả lời, câu hỏi phụ, câu trả lời mặc định, đánh giá, hạn ngạch, hạn ngạch thành viên và cài đặt ngôn ngữ hạn ngạch. Bằng cách nhấp vào mũi tên màu xanh lá cây, một cửa sổ với các tùy chọn sau sẽ tải lên:
- Tạo một khảo sát mới: Các khảo sát mới có thể được tạo và thêm vào danh sách khảo sát;
- Nhập một khảo sát mới: Nếu bạn muốn nhập một khảo sát vào danh sách khảo sát của mình, hãy sử dụng chức năng này;
- Sao chép một khảo sát: Nó cho phép người dùng sao chép nhanh chóng một cuộc khảo sát. Điều này sẽ xuất hiện trong danh sách khảo sát từ đó có thể chỉnh sửa;
- Danh sách khảo sát: Nó cho phép bạn có được cái nhìn tổng quan về tất cả các khảo sát hiện có.
- Phản hồi số dư: Nó hiển thị số lượng phản hồi còn lại từ đăng ký của bạn. Vì hiện tại bạn chỉ có quyền truy cập vào tài khoản miễn phí nên bạn có thể nhận được 25 phản hồi mỗi tháng. Nếu bạn hết câu trả lời, hãy mua thêm từ liên kết sau;
- Dung lượng: nó thể hiện dung lượng MB mà bạn có thể tùy ý sử dụng để lưu trữ các khảo sát và câu trả lời của mình. Vì bạn đã tạo một tài khoản miễn phí nên bạn sẽ có 10 MB dung lượng lưu trữ. Nếu bạn muốn nhận thêm dung lượng lưu trữ, hãy chọn một trong các tùy chọn sau tại đây;
- Tên người dùng: Bằng cách nhấp vào nó, bạn có thể truy cập tùy chọn người dùng của mình hoặc đăng xuất khỏi tài khoản của mình;
- Thông báo: Thông báo khác liên quan đến cài đặt LimeSurvey của bạn sẽ được gửi hiển thị ở đây.
Có sáu hộp mặc định trên trang chủ của bản cài đặt LimeSurvey của bạn:
- Tạo một khảo sát mới
- Liệt kê các khảo sát có sẵn
- Chỉnh sửa cài đặt chung
- 'ComfortUpdate '
- Bộ nhãn
- Trình chỉnh sửa mẫu
Tạo khảo sát
Để tạo khảo sát, nhấp vào ô Tạo khảo sát mới:
Trang Tạo khảo sát' sẽ được hiển thị:
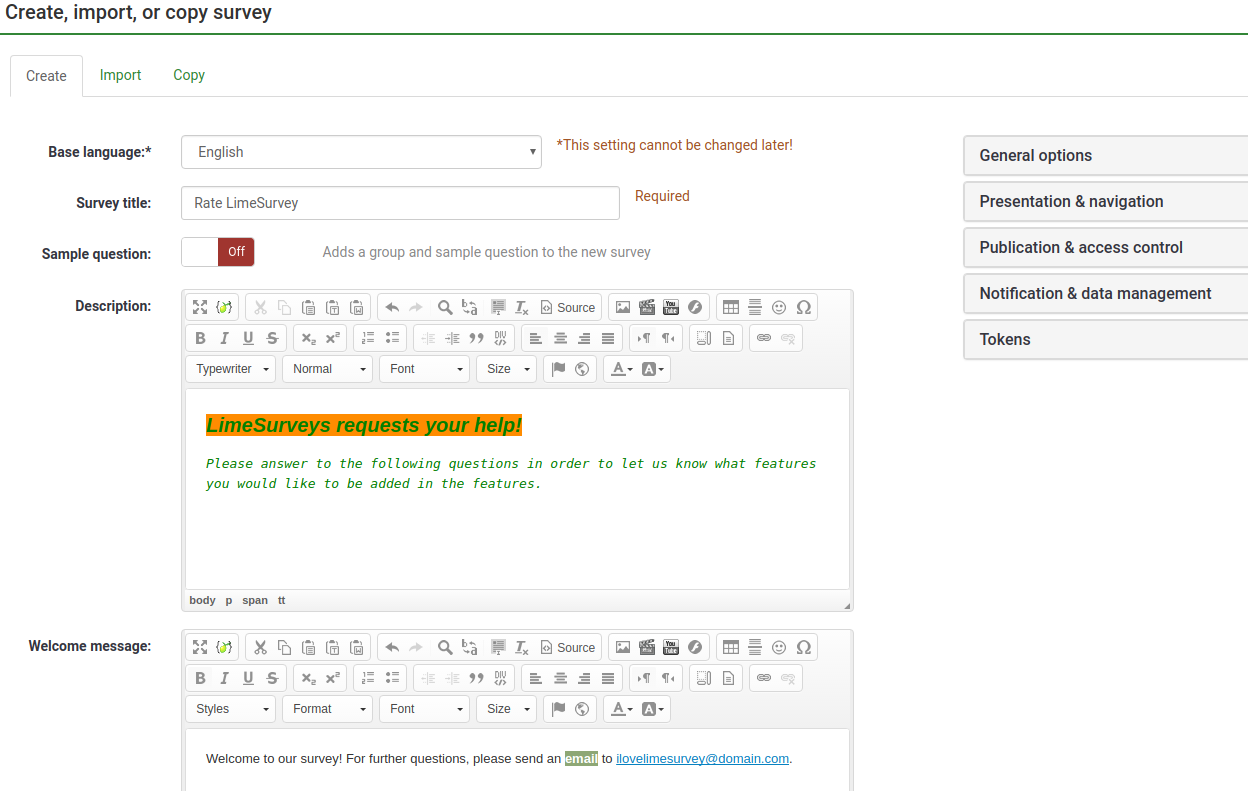
Các tùy chọn sau sẽ được hiển thị:
- Ngôn ngữ cơ bản: Đây là ngôn ngữ chính của khảo sát. Các ngôn ngữ bổ sung có thể được thêm sau từ cài đặt của khảo sát;
- Tiêu đề khảo sát: Tiêu đề của khảo sát phải được nhập ở đây. Nó có thể được thay đổi sau;
- Câu hỏi mẫu: Nó bị tắt theo mặc định. Nếu bạn bật tính năng này, một nhóm câu hỏi và ví dụ về câu hỏi sẽ được thêm vào khảo sát của bạn.
- Mô tả: Có thể thêm mô tả ngắn về khảo sát tại đây;
- Thông báo chào mừng: Những người tham gia khảo sát sẽ được nhắc nhở bởi thông báo chào mừng này nếu có gì đó được nhập in;
- Kết thúc tin nhắn: Nhập tin nhắn sẽ được hiển thị cho những người tham gia khảo sát khi họ gửi câu trả lời cho bảng câu hỏi.
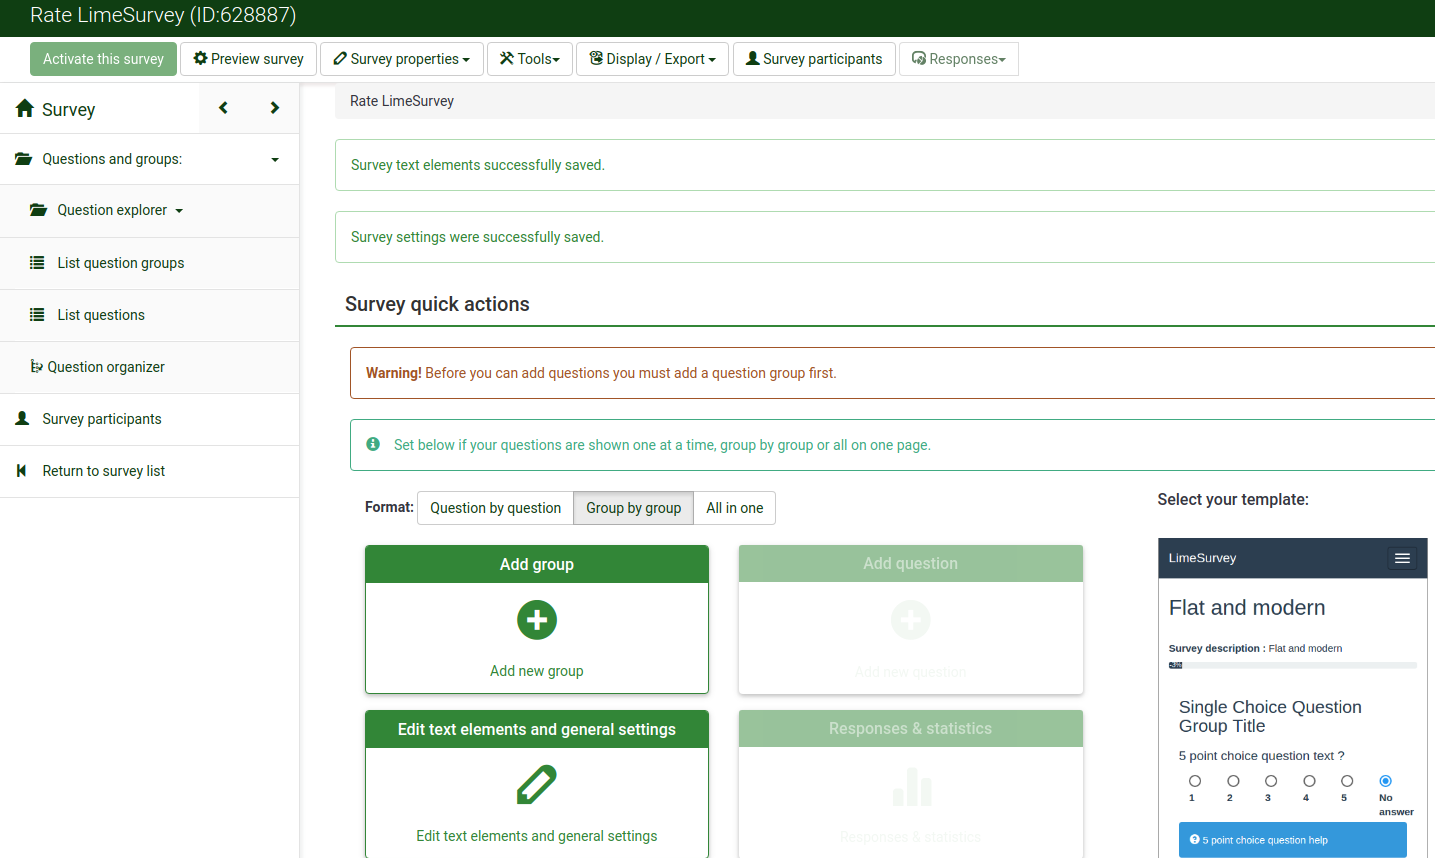
If you are done completing the fields, click on the Save and close button located in the upper-right part of the window. You will be redirected to the home page of your recently added survey:
Create a question group
A question group is used to group different elements of a survey like descriptions, questions, and answers.
To create a question group, you have to first access the survey to which you want to add the question group. To do that, click on the Surveys button located on the top toolbar from the LimeSurvey home page:
Click on the survey you wish to add the question group to. The survey page will show up. Look for the Add group panel in the middle of the page:
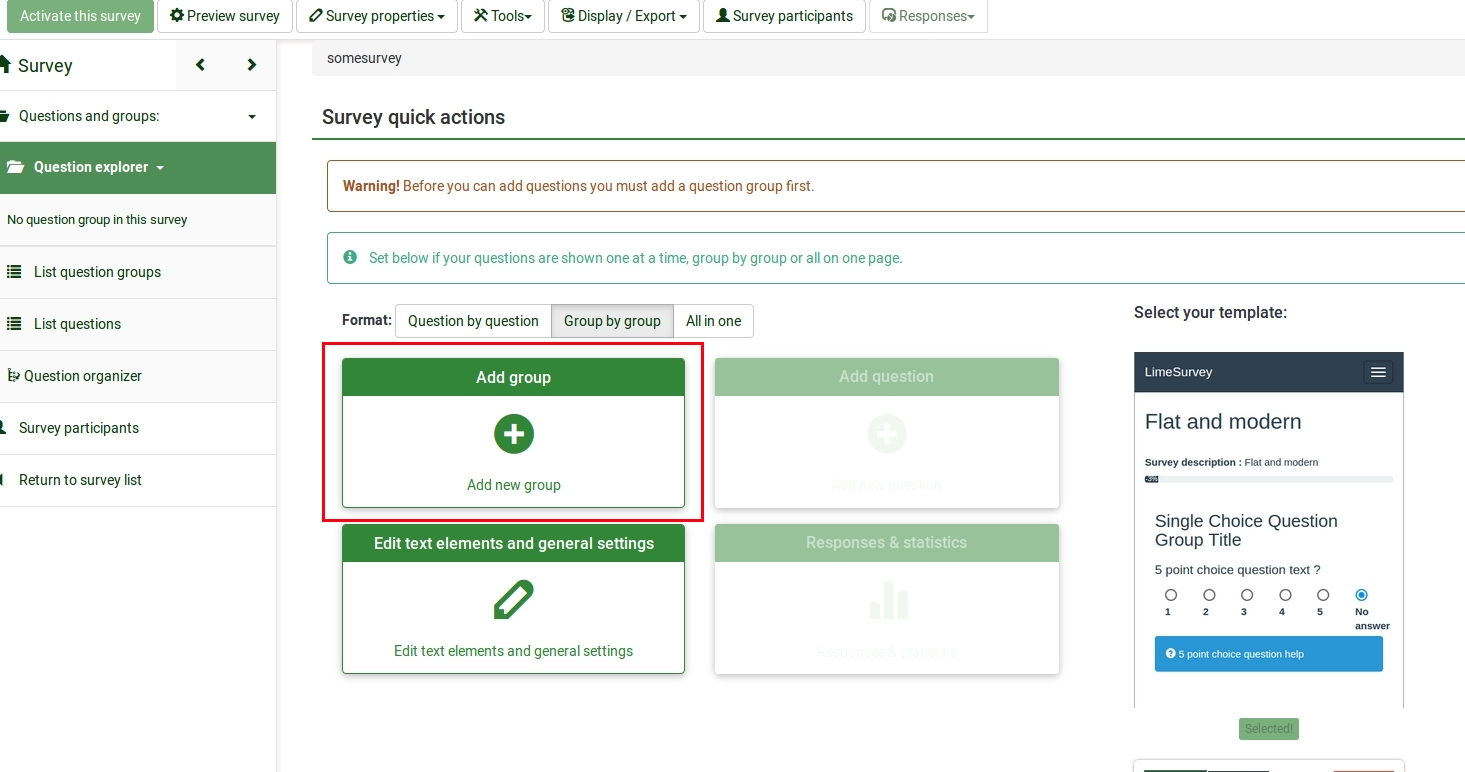
The following page will be displayed:
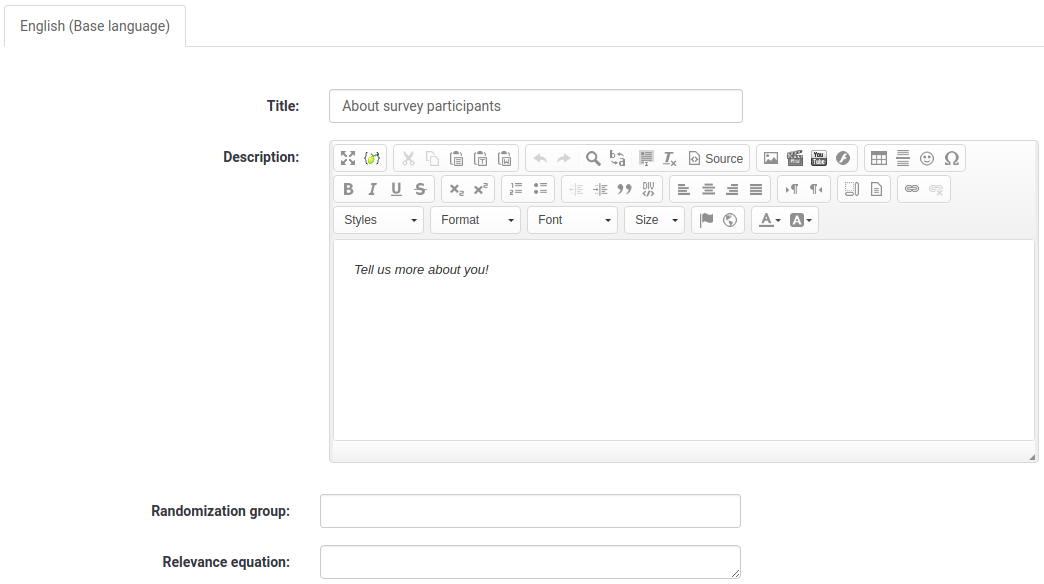
- Title: The name of the survey group;
- Description: A short description of the question group can be typed in. It can be displayed to the survey participants if the corresponding option is enabled from the settings of the survey;
- Randomization group: This function is used when you would like to randomize certain question groups (the same has to be allocated to the respective question groups);
- Relevance equation: It is used to make survey participants answer only to certain question groups, according to their prior answers.
Once done, click on the Save and close button located in the upper-right part of the window.
To get an overview of all question groups, go to the Survey menu and click on: Questions and groups -> List question groups:

Create a question
To create a new question, you need to first create a question group. Please check the steps presented above to see how you can add a question group to a survey. Once done creating the survey group, select the List question groups button from the survey menu:

A list with the all the survey question groups will show up.
Now, look in the last column. It shows you four buttons, representing the available question group actions:
- Add new question to group: It is used to start adding questions to the corresponding question group;
- Edit group: It allows the user to edit the respective question group;
- Group summary: If clicked, a summary page of that question group will be displayed;
- Delete: One option to delete the question group is to click on the red trash button.
Click on the first button and start adding your question to the desired question group. The Create question page will load up. It contains the following options:
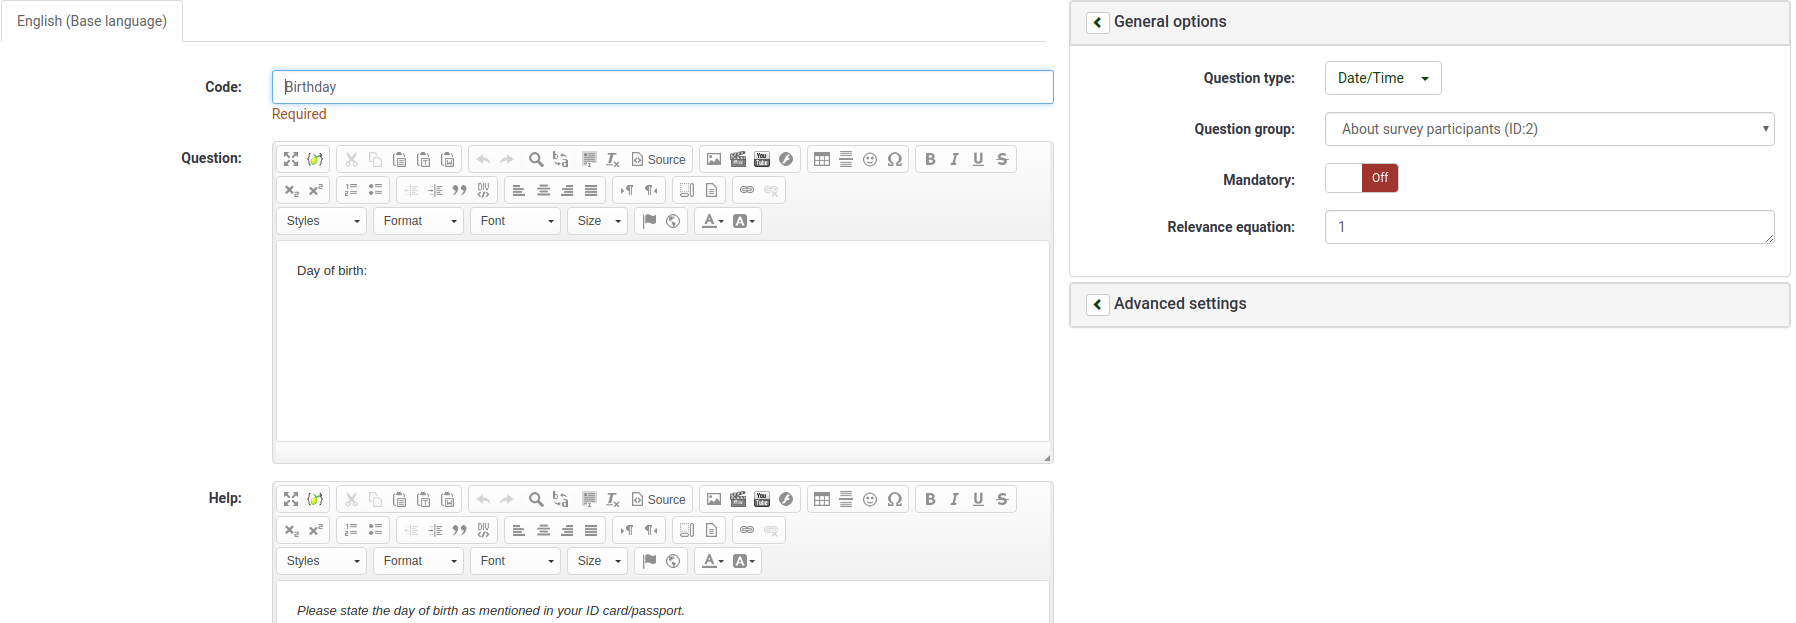
- Code: It represents the individual question name/code with which the survey is saved in the database and can be used further in more complex and advanced types of questions;
- Question: The name of the question that will actually appear in the survey for the survey participants;
- Help: A short text can be provided in order to help the survey participants better understand the question;
- General options: The functionalities located under this option allow you to modify the most important question-related settings. It includes four options:
- Question type: Many question types can be used in LimeSurvey. To better understand them, hover the mouse over each option or read our wiki on questions;
- Question group: You can choose here which question group you would like to add the question to;
- Validation: This feature is available on all free text type or numeric questions. It is used for response validation. If the response is not validated, the user will be prompted to try again before they can progress;
- Mandatory: It is available for all question types. This setting allows you to require users to answer the question before they can move on to the next question;
- Relevance equation: It is a setting for advanced users. It is recommended to use the default value of "1" (it means that the item will be always shown);
- Advanced settings: The advanced settings are different for each question type. Please consult the documentation for your particular question type.
Click on the Save button. Once done, you will be redirected to a page that contains the summary of the recently added question:
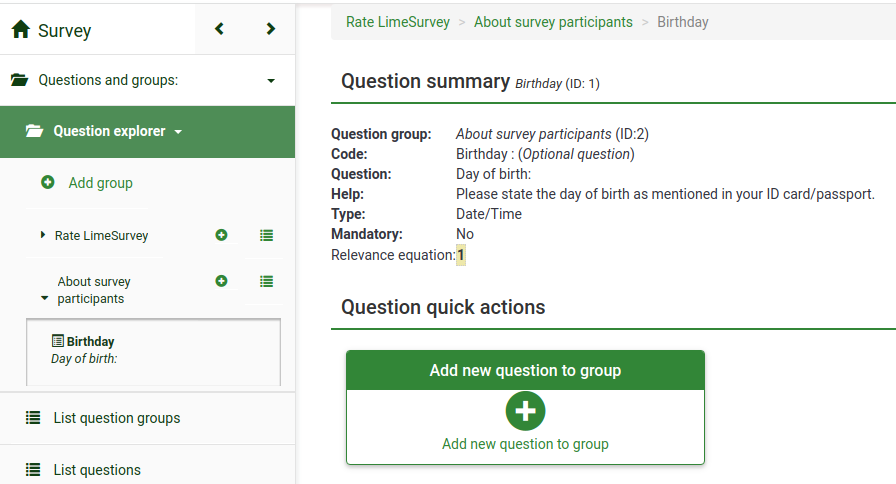
To add more questions, click on the Add new question button located in the Question quick actions menu.
Add subquestions and answers
Different types of questions require subquestions, predefined sets of answers, both or none. For example, a question that requires the age of a survey participant does not require any subquestion or predefined set of answers. On the other hand, a simple array question requires both subquestions and set of answers.
The next screenshot contains an array-type question:

Add subquestions
To add subquestions, go to the top toolbar and click on Edit subquestions. Type in the subquestions you wish the survey participants to answer to:

Add answers
To add a set of predefined answers, go to the top toolbar and click on Edit answer options. Type in the answers:

Save the set of answers and preview the question (look for the Preview question button located on the top toolbar).
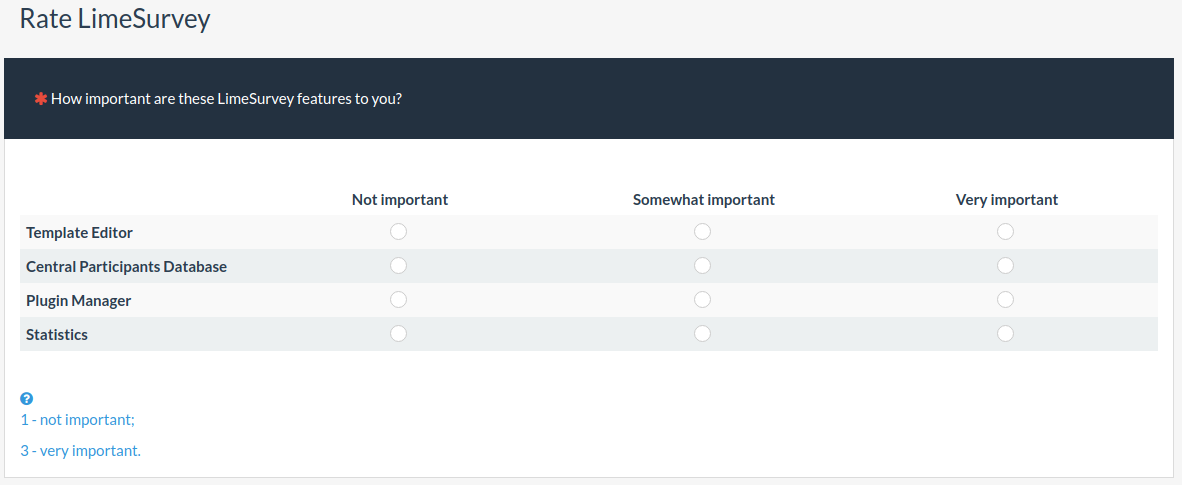
Congratulations! You have successfully created your first array-type question.
Organize questions
If your survey already contains dozens of questions, it is a time-consuming process to access each question and/or question group and edit the order one-by-one. Therefore, to quickly reorganize your questions and question groups, use the Question organizer function (Survey menu -> Questions and groups -> Question organizer).
To reorder them, just drag the question/group and drop it to the desired position. Do not forget to click on the Save button to save your changes.

Activate/Stop survey
Now that you have at least one question and question group added to your survey, you can activate it. Go to the home page of your survey by clicking on the Survey button, located on the top of the survey menu:
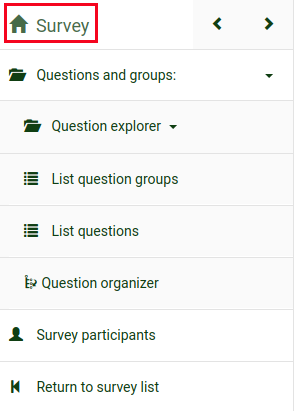
Check the toolbar. The Activate this survey option should be available:
Before activation, a window will be displayed, asking you about some general survey settings:
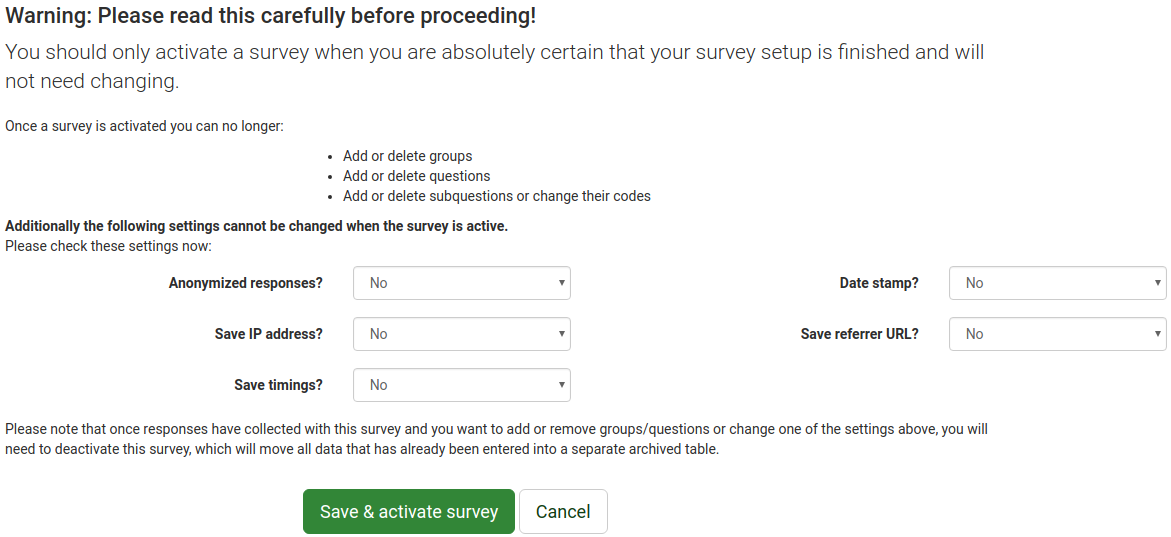
- Anonymyzed responses: This option allows you to determine whether responses to your survey are matched up with information from your survey's token table, or kept "anonymous". If you decide to enable it, your survey is set to anonymize responses - there will be no way to connect answers and participants;
- Save IP address: If enabled, the IP address of the survey respondent will be stored together with his/her answers;
- Save timings: If enabled, the time spent on each page of the survey by each survey participant is recorded;
- Date stamp: Turn it on if you would like to see the date the answers were submitted;
- Save referrer URL: If enabled, the referrer URL will be stored together with the answers.
Once you are done enabling the desired functionalities, click on the Save & activate survey button. The following message should be displayed:
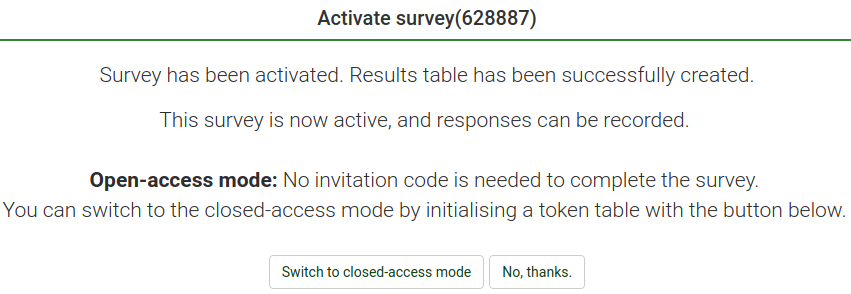
Select the option No, thanks to disable the closed-access mode! In this way, everyone will have access to your survey.
Congratulations! You have activated your first survey! If you want to start sharing the survey URL, go to the home page of your survey, and look for the survey URL in the Survey summary:

Copy the link and start sharing it.
If you want to stop the interview, access the home page of the survey and look for the Stop this survey button located on the top toolbar:

Statistics
To quickly see your survey statistics, click on the Survey button located on the top toolbar of your LimeSurvey home page. A list with all the available surveys will be displayed. Now, go to the last column and click on the Statistics button (![]() ) that corresponds to the row of the survey you wish to analyse:
) that corresponds to the row of the survey you wish to analyse:

A new window with a set of graphs will be loaded up. If you want to use them in a report, scroll down and click on the Export images button located on the bottom-left part of the page. All the charts will be separately saved as .png files and archived in a .zip file.
On the upper-right part of the window, you can see the Expert mode button. Click on it in order to access more statistics-related filters.
Once you select the filters according to your desired analyses, click on the View Statistics button located on the upper-right part of the window.
According to the chosen output, the results are displayed in HTML, Excel or PDF.
Exporting the questions and responses
If you want to export the results in a different format in order to produce statistics and graphs using other apps such as SPSS, R, STATA, etc., access the survey you want to analyse. Click on the Responses button located on the top toolbar, and then on Responses & Statistics:

Now you are on the Browse responses page. Look at the top toolbar for the Export button and select the desired format you wish to export to. If you select the first option, all the availalbe formats in which you can export the data will be displayed:

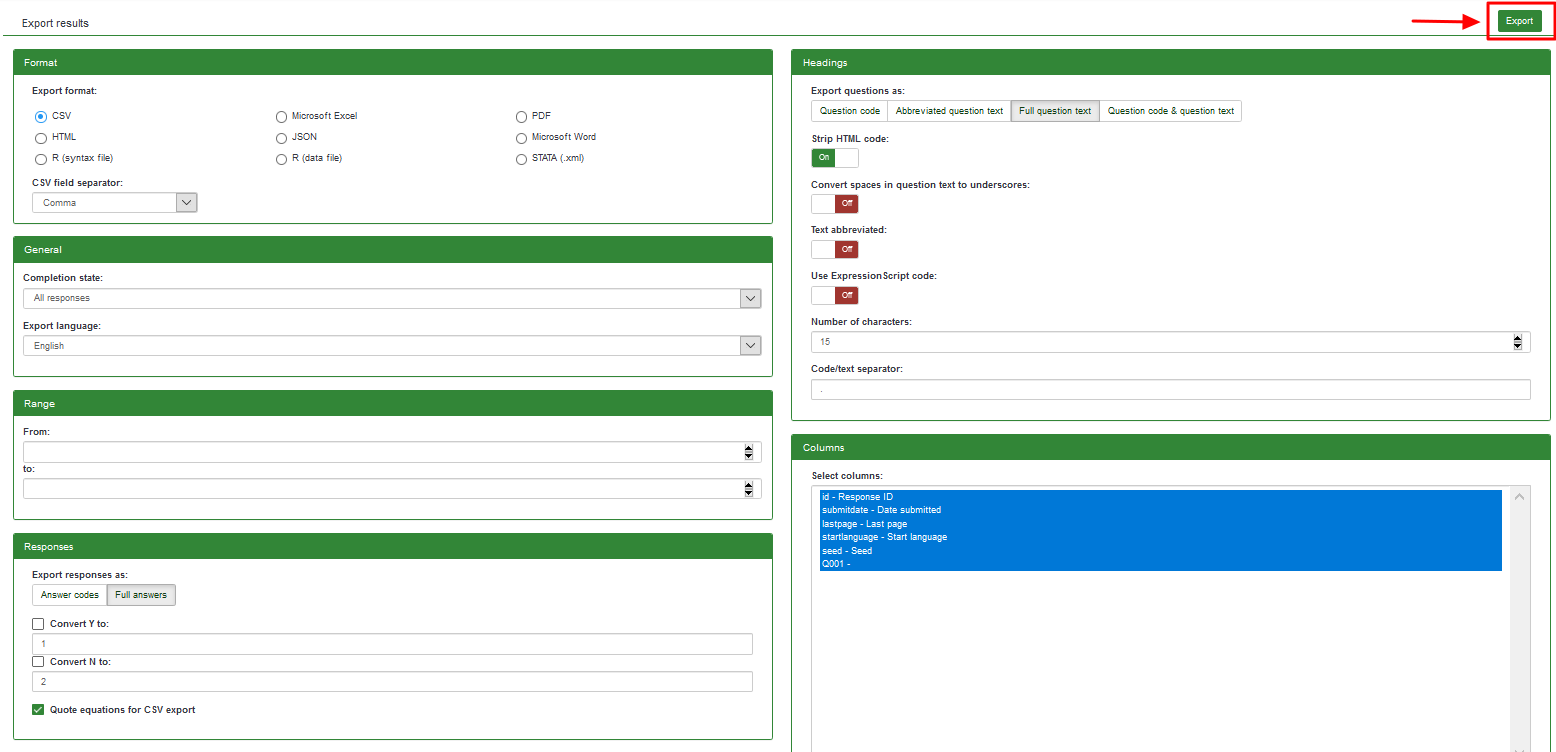
Once the filters are set, click on the Export button located in the upper-right side of the window.
Other LimeSurvey features - advanced users
Check the features of LimeSurvey Pro package by clicking on the following link: https://www.limesurvey.org/editions-and-prices/limesurvey-pro/professional-features.
If further questions arise, please post them on our forum or join the IRC channel.