Theme editor - advanced options: Difference between revisions
From LimeSurvey Manual
mNo edit summary |
mNo edit summary |
||
| Line 2: | Line 2: | ||
<languages /> | <languages /> | ||
When you open the options | When you open the '''theme options''' tab, you can choose to edit either its ''simple options'' or its ''advanced options''. “Advanced options” is just a naked form that gives you access to the main theme configuration fields from the database. To understand how it works, you should also read about the XML file and the creation of a theme from scratch. So, it’s rather complex and made for advanced users. | ||
However, if you do wish to perform advanced settings editing, click on the ''advanced options'' tab | |||
| Line 8: | Line 10: | ||
*'''Files css''': | *'''Files css''': The CSS files that should be added to the template; | ||
*'''Files js''': | *'''Files js''': The JS files that should be added to the template; | ||
*'''Files Print Css''': | *'''Files Print Css''': The CSS files to load when printing a template; | ||
*'''Options''': the options (and their value) that should be parsed to the template view; | *'''Options''': This field includes the options (and their value) that should be parsed to the template view; | ||
*'''CssFramework Name''': The name of the CSS framework to load. For now, only Bootstrap or nothing; | *'''CssFramework Name''': The name of the CSS framework to load. For now, only Bootstrap or nothing; | ||
*'''Cssframework Css''': | *'''Cssframework Css''': You can replace the core bootstrap.css in this field by a different custom version of it; | ||
*'''Cssframework Js''': | *'''Cssframework Js''': The field core boostrap.js can be replaced from here by a different custom version of it; | ||
*'''Packages To Load''': | *'''Packages To Load''': You can load from this setting some core asset packages from LimeSurvey. | ||
You’ll notice an upload input at the top, | You’ll notice an upload input at the top, which gives you the possibility to upload a file into the file directory of the theme. | ||
These parameters can be used to change the entire appearance of the theme. | |||
{{Alert|title=Warning!|text= | {{Alert|title=Warning!|text='''Don't touch the values unless you know what you're doing!'''}} | ||
<div style="display:none;"></translate></div> | <div style="display:none;"></translate></div> | ||
Revision as of 16:16, 11 January 2018
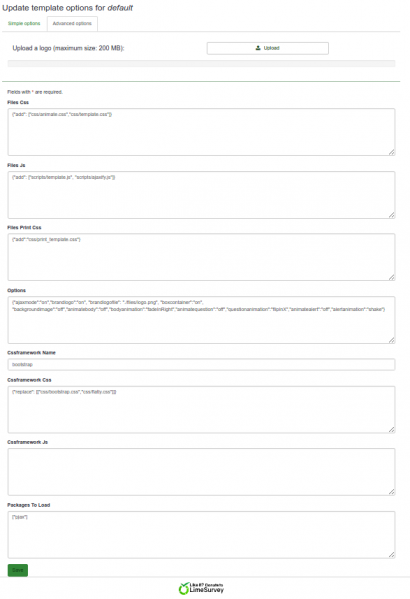
When you open the theme options tab, you can choose to edit either its simple options or its advanced options. “Advanced options” is just a naked form that gives you access to the main theme configuration fields from the database. To understand how it works, you should also read about the XML file and the creation of a theme from scratch. So, it’s rather complex and made for advanced users.
However, if you do wish to perform advanced settings editing, click on the advanced options tab

- Files css: The CSS files that should be added to the template;
- Files js: The JS files that should be added to the template;
- Files Print Css: The CSS files to load when printing a template;
- Options: This field includes the options (and their value) that should be parsed to the template view;
- CssFramework Name: The name of the CSS framework to load. For now, only Bootstrap or nothing;
- Cssframework Css: You can replace the core bootstrap.css in this field by a different custom version of it;
- Cssframework Js: The field core boostrap.js can be replaced from here by a different custom version of it;
- Packages To Load: You can load from this setting some core asset packages from LimeSurvey.
You’ll notice an upload input at the top, which gives you the possibility to upload a file into the file directory of the theme. These parameters can be used to change the entire appearance of the theme.