Tjek undersøgelseslogik - Avanceret
From LimeSurvey Manual
Generelt
En vigtig mulighed, der hjælper dig med at oprette og nemt vedligeholde komplekse undersøgelser, er Check Survey Logic.
Under hele udviklingen og afprøvningen af undersøgelsen, og før den aktiveres, er det meget vigtigt at validere undersøgelseslogikken. Dette gælder især, når du bruger komplekse relevans-, skræddersy- og valideringsligninger - du skal være sikker på, at intet går i stykker, når du kører undersøgelsen.
Denne funktion lader dig hurtigt validere nøjagtigheden af din undersøgelse, gruppe(r) og spørgsmål. Den kan tilgås fra menuindstillingerne i den øverste bjælke, der er placeret under de undersøgelsesrelaterede indstillinger. Den er tilgængelig via menuen Værktøjer:
Som du kan se ovenfor, kan du køre denne mulighed fire gange for hvert sprog, der bruges i en undersøgelse.
Beskrivelse
Valgmuligheden Kontroller undersøgelseslogik viser alt, hvad du har angivet for hvert spørgsmål og gruppe (f.eks. navn, tekst, hjælp, betingelser/relevans, valideringsregler, standardindstillinger, underspørgsmål, svar) i et praktisk tabelformat. Det fremhæver fejlene og lader dig klikke på spørgsmålet og gruppe-id'erne (eller variabler, der bruges i ligninger) for at åbne nye browserfaner for at redigere disse spørgsmål eller grupper. Dette gør det nemt hurtigt at redigere eventuelle fejl og opdatere logikkontrolsiden for at bekræfte undersøgelsens nøjagtighed, før den aktiveres.
Displayet er også designet til at kunne læses af forskere og studiesponsorer, så de kan validere nøjagtigheden af undersøgelsens design og logik. Kontrol af undersøgelseslogikken opdaterer cachen for alle udtryk, der bruges i en aktiv undersøgelse.
Det inkluderer følgende kolonner:
- # - viser antallet af gruppe- og spørgsmålssekvenser, startende fra 0.
- Navn [ ID] - viser spørgsmålskoden for gruppen/spørgsmålet/underspørgsmålet. Disse koder kan bruges som variable i udtryk. ID er spørgsmåls-id (QID) eller gruppe-id (GID). Dette felt viser også spørgsmålstype (f.eks. Multiple choice [M])).
- Relevans [ Validering] (Standard) - viser følgende:
- Relevans - den syntaks-fremhævede relevansligning for spørgsmålet eller gruppen. Hvis det altid er sandt (skal vises i ethvert scenarie), vil værdien være 1.
- Validation - ExpressionScript genererer automatisk valideringen ligning baseret på de valgte spørgsmålsattributter (f.eks. min/maks. antal svar, min/maks/lig med sumværdier, min/maks individuelle værdier eller validering af regulære udtryk). Dette afsnit viser den genererede valideringsligning, så du kan opdage, om der er fejl (såsom udefinerede variabler).
- Validering på spørgsmålsniveau viser den ligning, der er nødvendig for at verificere de ovenfor beskrevne spørgsmålsattributter
- **Validering på underspørgsmålsniveau viser den ligning, der er nødvendig for at implementere array_filter, array_filter_exclude og exclusive_option
- Standard - hvis spørgsmålet har en standardværdi, vises det her, syntaks-fremhævet (da standarden kunne være et udtryk).
- Tekst [ Hjælp] (Tip) - viser følgende:
- Tekst - teksten til gruppen, spørgsmålet, underspørgsmålet eller svaret. Det er syntaks-fremhævet for at vise enhver indlejret skræddersy, således at du kan bekræfte, at du har erklæret alle de variabler, du planlægger at bruge i skræddersyet.
- Hjælp - dette viser hjælpeteksten til spørgsmålet, også syntaks-fremhævet.
- Tip - dette viser det internt genererede valideringstip, baseret på spørgsmålets attributter. Det samme tip bruges i alle undersøgelsesstile, plus i de udskrivbare undersøgelses- og dataindtastningsskærme.
- Spørgsmålsattributter - dette viser en tabel med alle relevante spørgsmålsattributter for dette spørgsmål. Attributter, der kan være ligninger, er syntaks-fremhævede, så du kan validere deres nøjagtighed.
Rækker er farvekodet som følger:
- Grupper - vises med en lysegrå baggrund
- Spørgsmål - vises med en lysegrøn baggrund
- ' Underspørgsmål' - vises med en lysegul baggrund
- Svar - vises med en almindelig hvid baggrund
Svar har en ekstra egenskab i kolonnen Relevans:
- Værdi - dette er den interne standardværdi, der bruges til beregninger. Hvis du bruger vurderinger, vil dette være vurderingsværdien. Ellers vil dette være det samme som svarets navn.
Usage
At the top of the page, there is a summary message. If all is well, it will say "No syntax errors detected in this survey", or "This group" or "This question", "by itself, does not contain any syntax errors". If the opposite is true, it will say "X questions have syntax errors that need to be corrected".
Each question that has syntax errors gets the background of its leftmost column (i.e. #) color-coded red. Also, a warning stating the number of minimum errors of a question will be displayed under the Name [ID] column. The following errors are common:
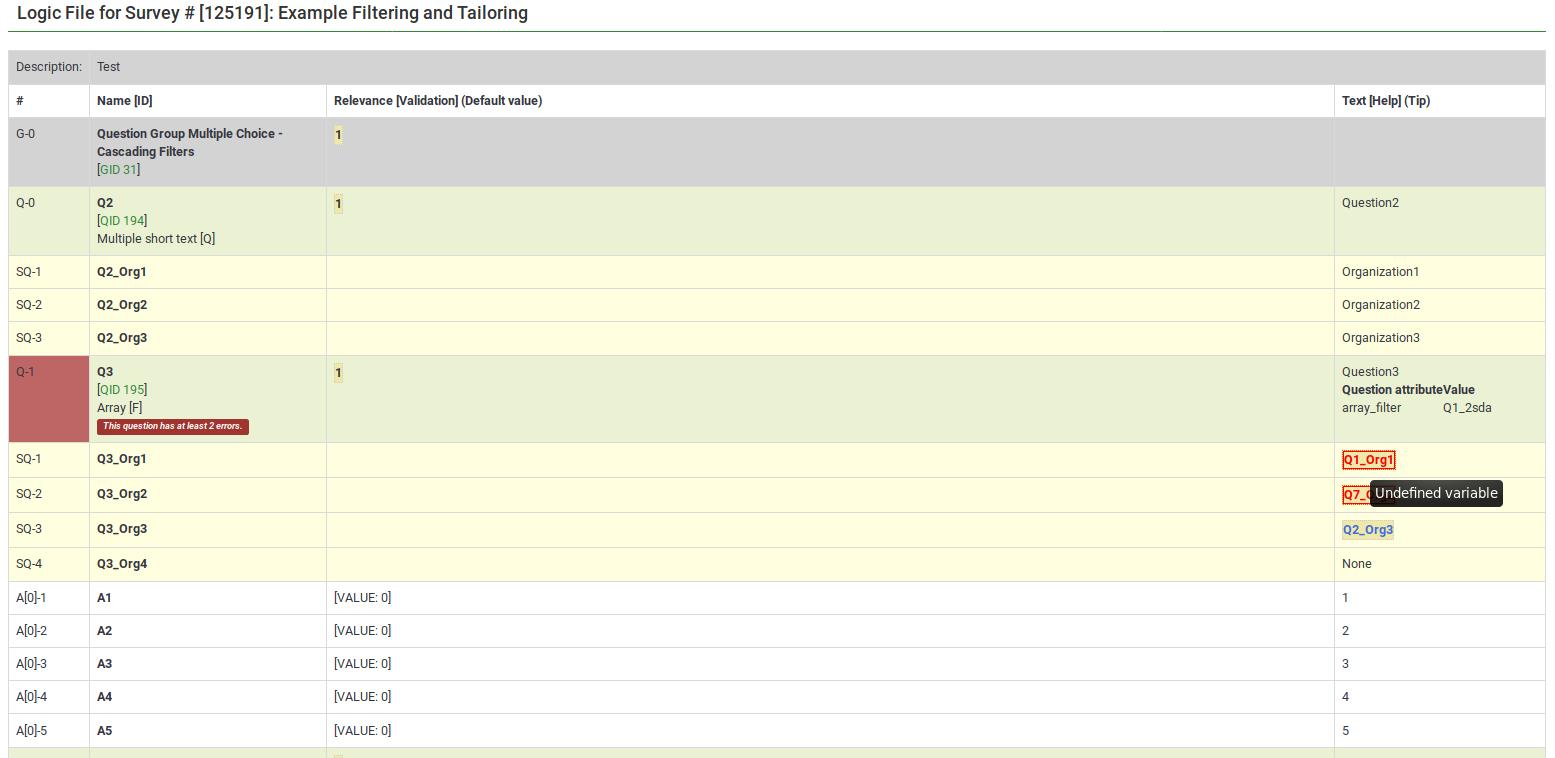
- Undefined variable - if you have not defined all of your variables, or mistyped array_filter (or different sets of answer options for array_filter), then some of your validation questions will show errors. Undefined variables are shown in red text, boxed with a red line.
- Bad syntax - as you start to use relevance equations, you may use too many or too few parentheses. Such syntax problems are highlighted and boxed in red. If you hover the mouse over any such red-boxed text, a tool-tip will describe the error.
Colors in ExpressScript syntax
Conditions and equations are syntaxhighlighted to easier figure out what you are looking at:
- Green / Light Blue: A variable that references a question earlier in the survey
- Blue: A function
- Grey: A string expression
- Brown: A TOKEN expression (participant data)
- Black: Operator
Things to check:
- Purple: A variable that references a question later in the survey. Usually this is an error and needs to be checked.
- Red or red frame: A non-existing variable or reference to an earlier question or a syntax error - usually needs to be checked.
Undefined Variables
If undefined variables are used, the respective variable name will be color-coded in red and surrounded by a red line. If you hover your mouse over the variable name, it will say "undefined variable":

}}
Bad syntax
Most of the expression-related mistakes are related to bad syntax. This is related to the fact that survey administrators usually miss to add a curly bracket, to properly make use of parentheses, or they use expressions wrongly:


Here are many good examples on the usage of syntax highlighting.
Bad custom JavaScript
The JavaScript errors will also be highlighted in the survey logic check:

Speeding editing and validation
All of the syntax-highlighted text has tooltips embedded, which are clickable:
- Tooltips
- Functions - hovering the mouse lets you see the purpose and syntax definition of the function;
- Variable Names - hovering the mouse lets you see the position (group, question sequence), question text, and allowable answers for the question.
- Actions
- Variable Names - clicking on the variable name opens a new window that allows you to edit the question. This makes it easy to navigate and verify logic - simply keep clicking on variable names of relevance or validation criteria for the question to see where they come from and how they are used.
Examples
The following examples are taken from the ExpressionScript sample surveys. You can find screenshots of running surveys, explanations, and downloads on that page.
Body Mass Index
Here are screenshots of this example.
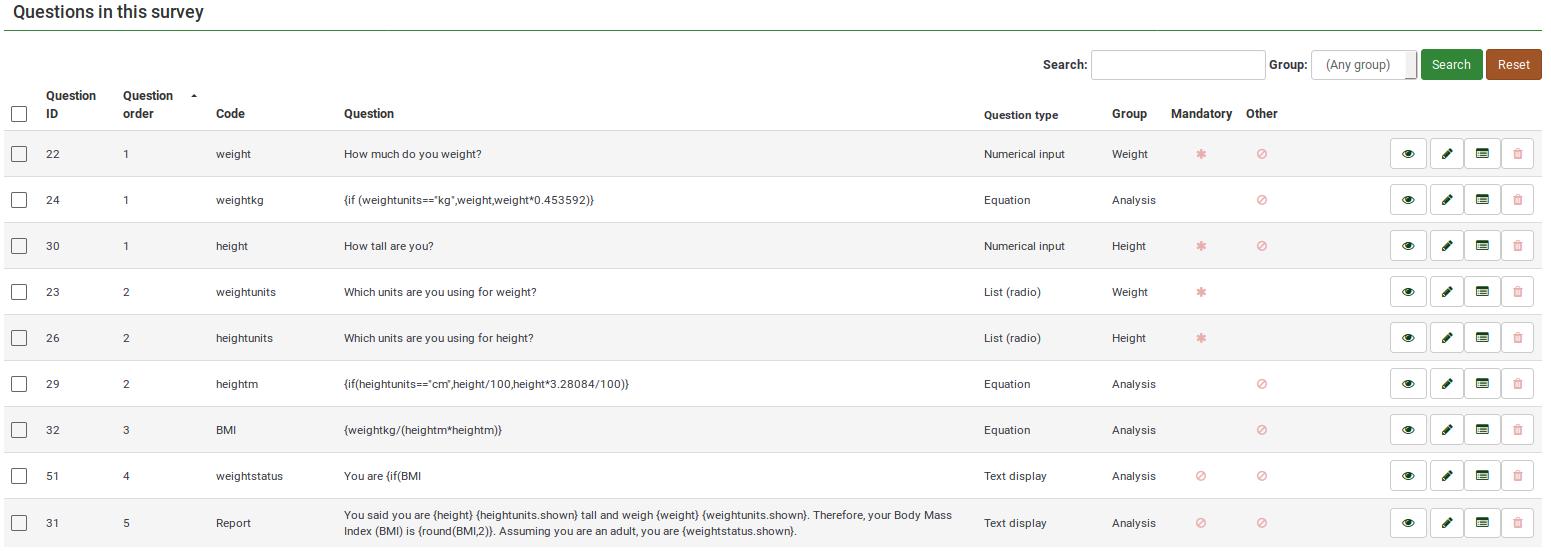
This is the question-reorder view of the Body Mass Index calculation. You can see the relevance equations for weight, height, and BMI under the Question column:
For a better survey overview, check the survey logic page:
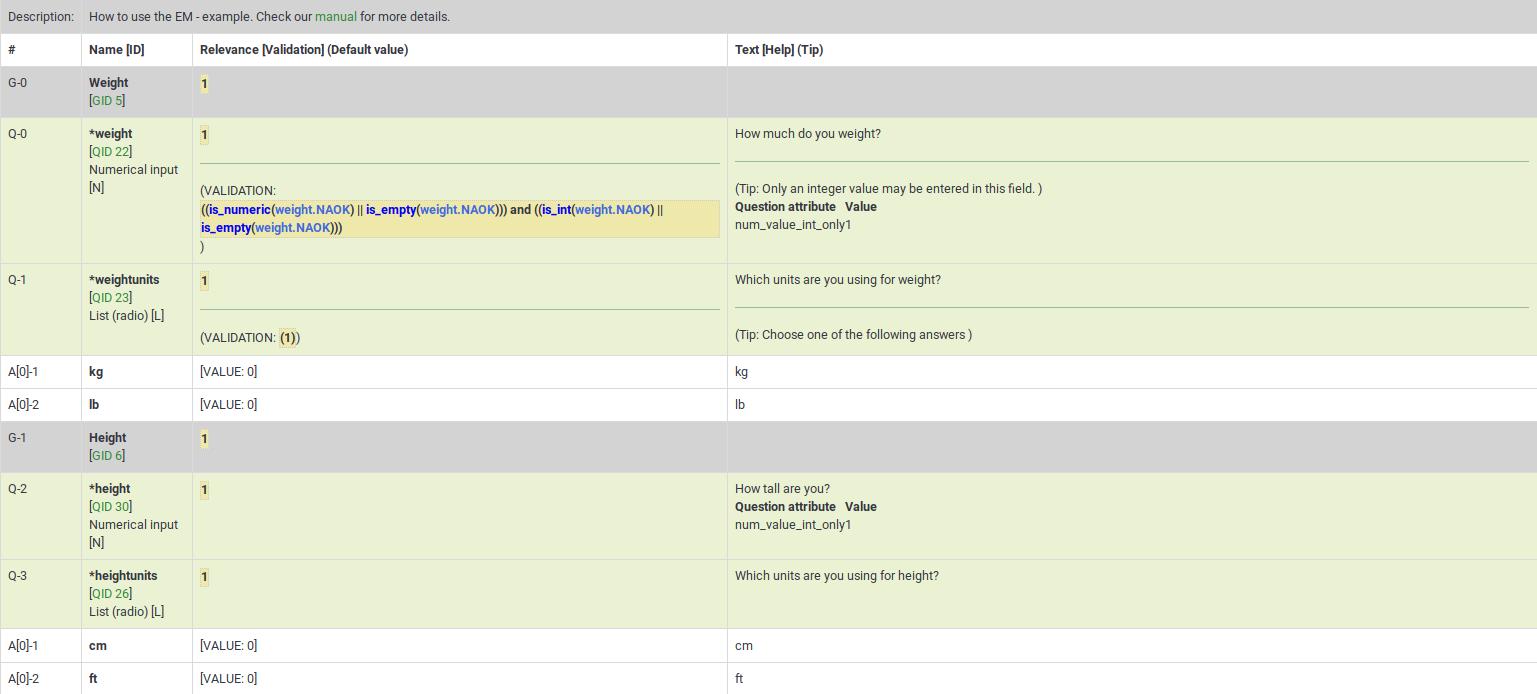
This survey example is also a good example of nested if() statements to generate the "weightstatus".

Cascading logic
Here are screenshots of this example.
It shows the subquestion validation logic that is automatically generated when you use array_filter and array_filter_exclude. This example also shows how you can substitute the tailored "Other" value (the answer for Q02_other is Q01_other).
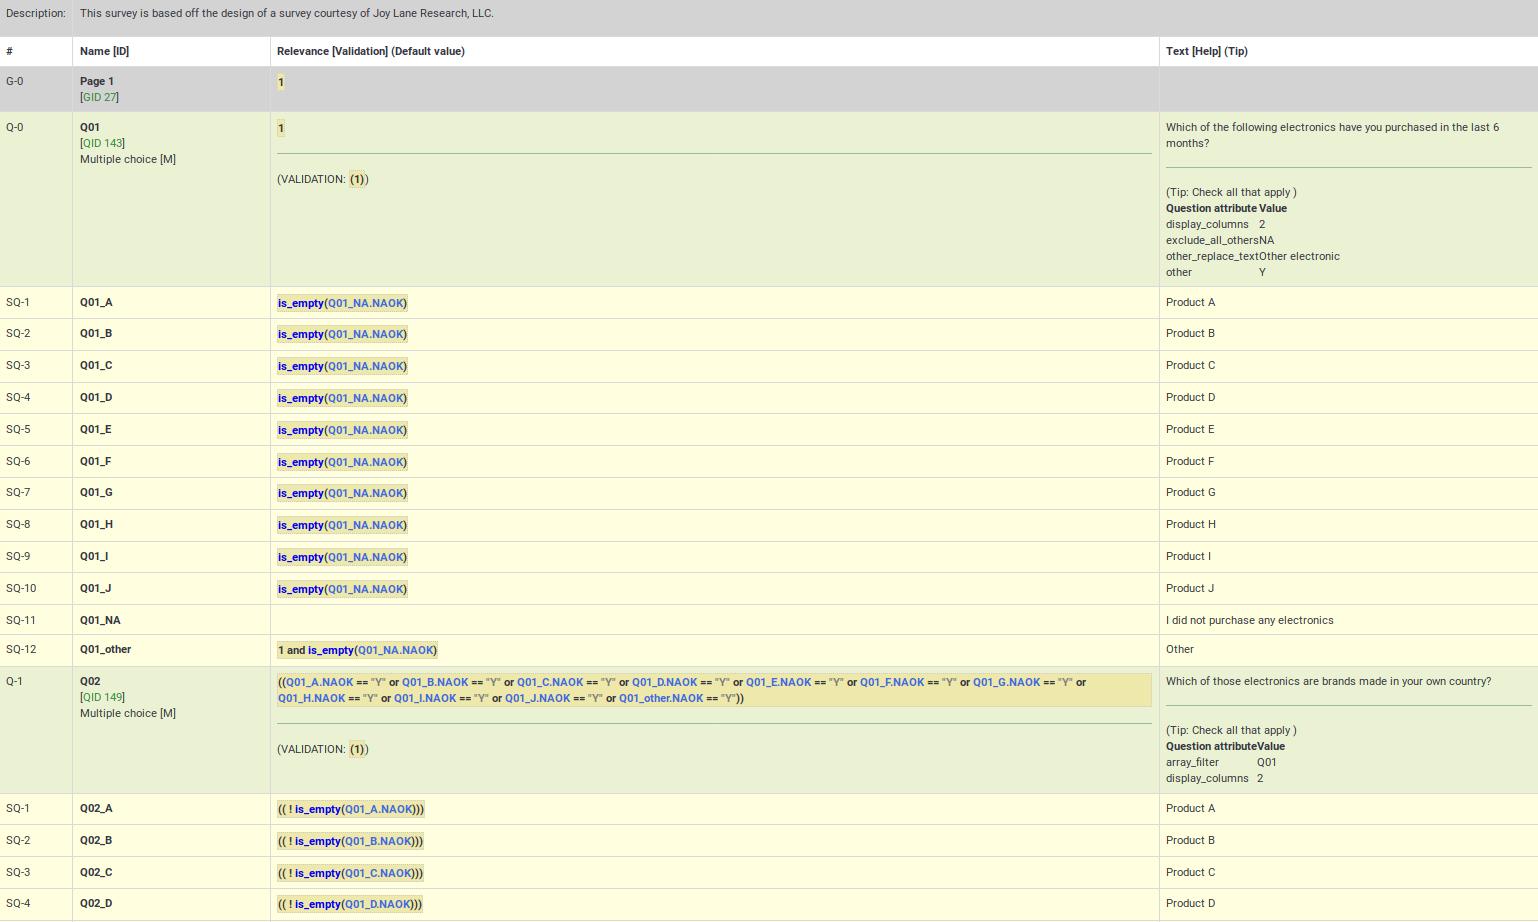
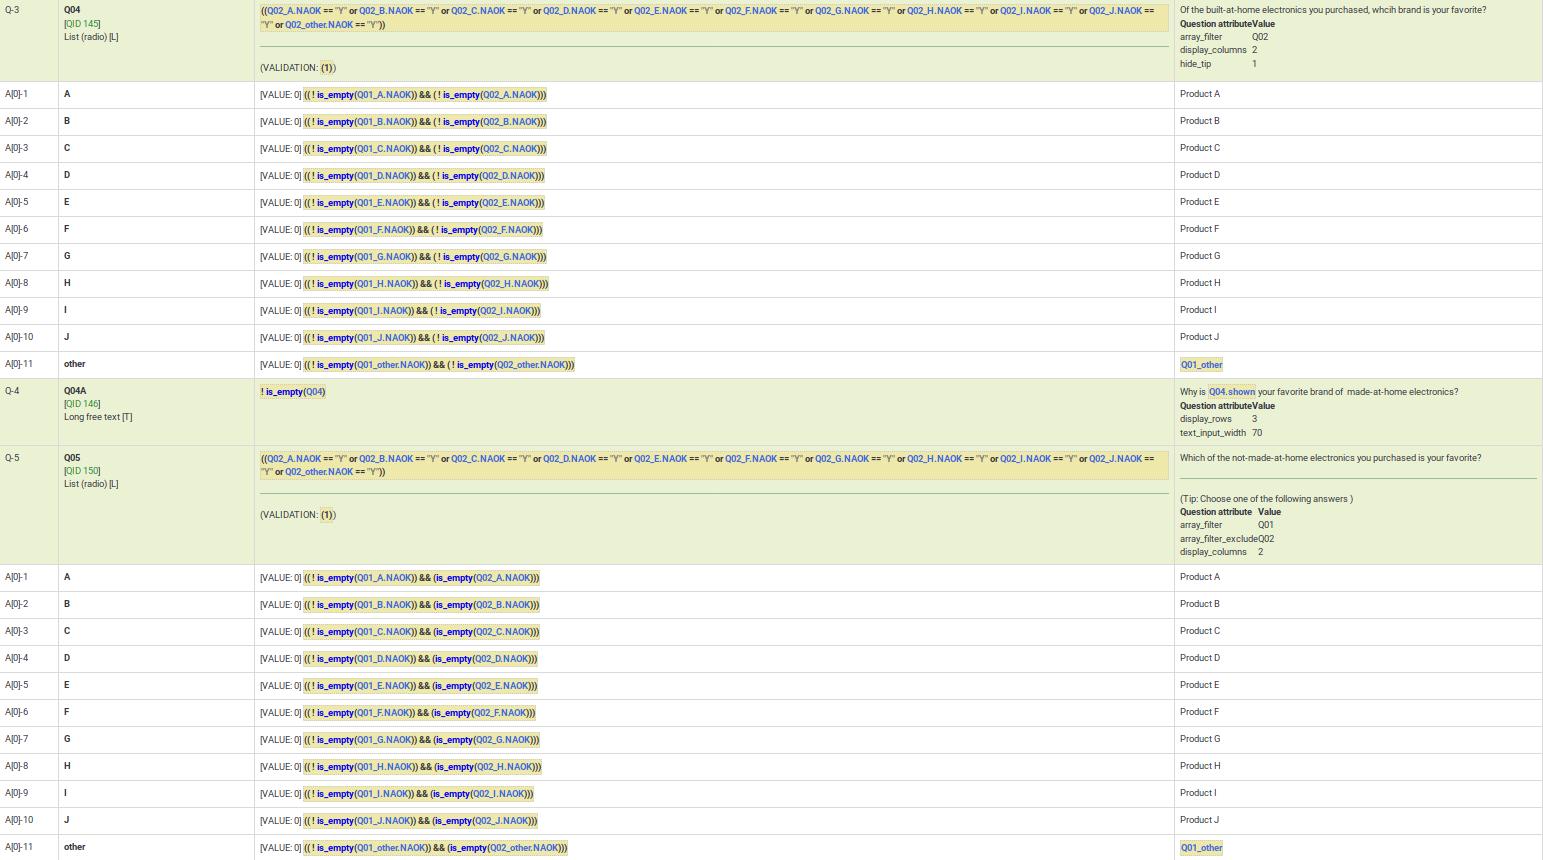
Q05 in this example shows simultaneous use of array_filter and array_filter_exclude on Q01 and Q02, respectively. This example demonstrates cascading array_filter capabilities. Note that one of the main reasons for showing the question and subquestion level validation criteria is to help ensure you have not made any typos in specifying the array_filter or array_filter_exclude variable names (or in case you use different variable names for your list of filtered subquestions). If you have such typos, all the invalid variable names will appear in red indicating that they are undefined, letting you quickly fix the problem.
Dynamic relevance
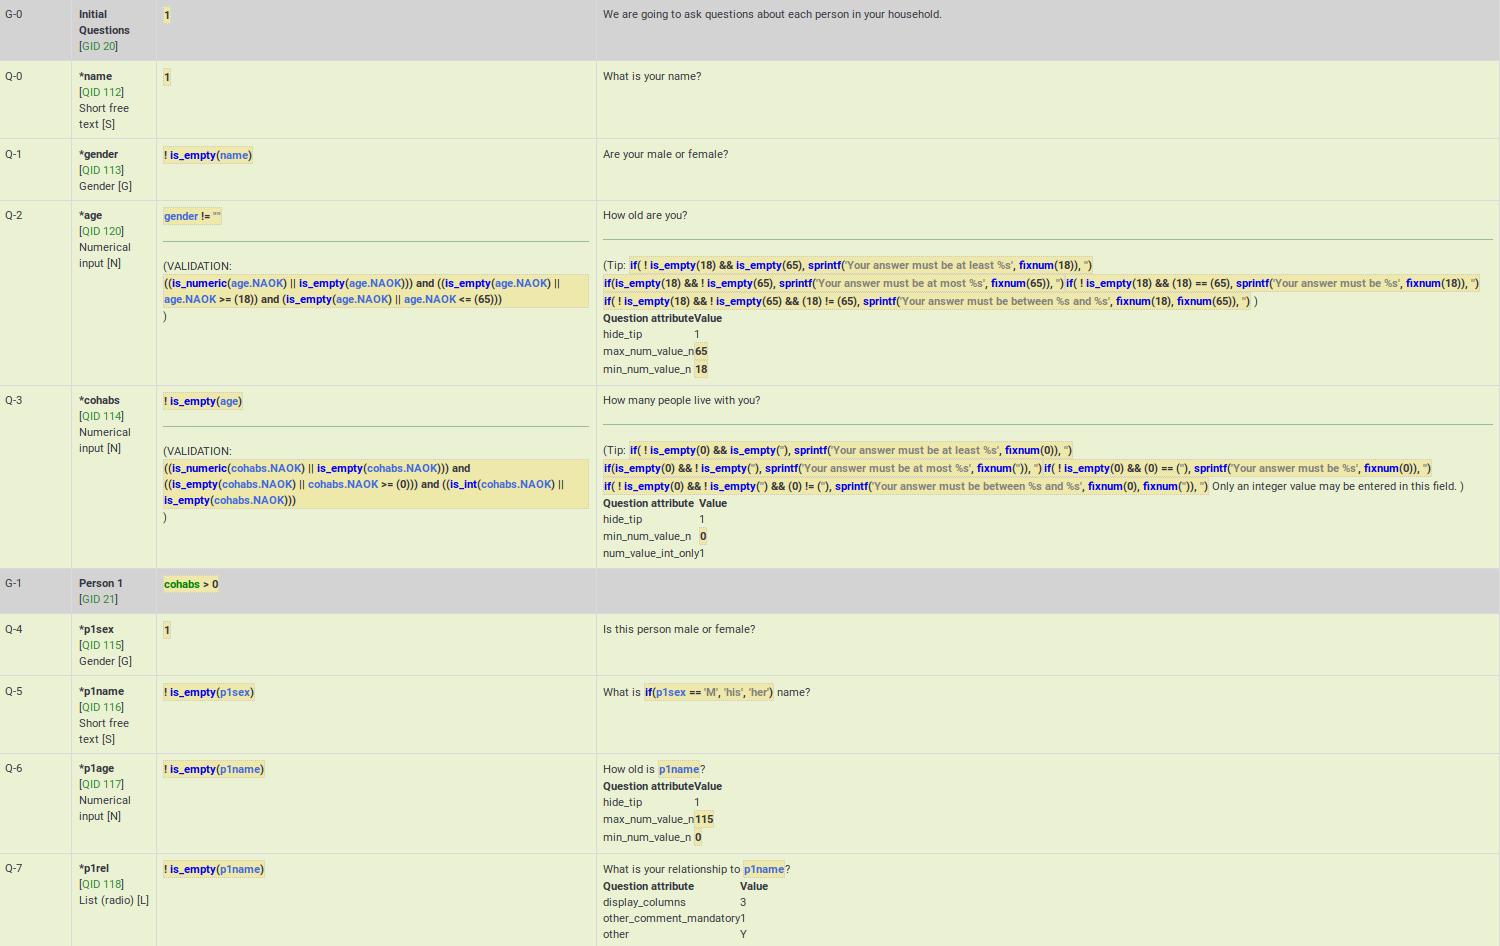
This example demonstrates dynamic cascading relevance logic to control display of question visibility. You can download this example here.
Also note that questions are displayed only if certain validation criteria are met. For example, if a person states that she has 2 kids, certain questions have to be filled in by the respondent (kid1 and kid2).
Group-level relevance
This example shows how group-level relevance appears in the logic check. Here are screenshots of the example described below.
As you can see, the group-level relevance equation (cohabs > 1 && p1_rel != "") appear in the grey Person 2 row for G-2.
You may also notice that all of the questions are mandatory. However, if the group is irrelevant, so are all its questions. As a result, those questions are only truly mandatory if the group is relevant.
You may also note that certain questions are displayed only if the answer to the previous question is not empty. You may see below that if p2_sex is not filled in, p2_name is not going to be displayed, even though it is a mandatory questions. The mandatory question p2_age is also not going to be displayed if p2_name is not filled in. These questions can be considered "conditionally mandatory".
Additionally, note that the tip messages are also automatically created for you. They are organized by value range (min/max), sum value range (min/max/equals), number of answers (min/max), etc (it depends on the used question type and active attributes). Sometimes you want to validate an answer range but don't want to display what might appear to be silly validation tips to the user. In such cases, you can use the hide_tip question option (as in this case, to avoid telling the user that the age must be between 0 and 115 unless they try to enter a bad value - see p2_age).

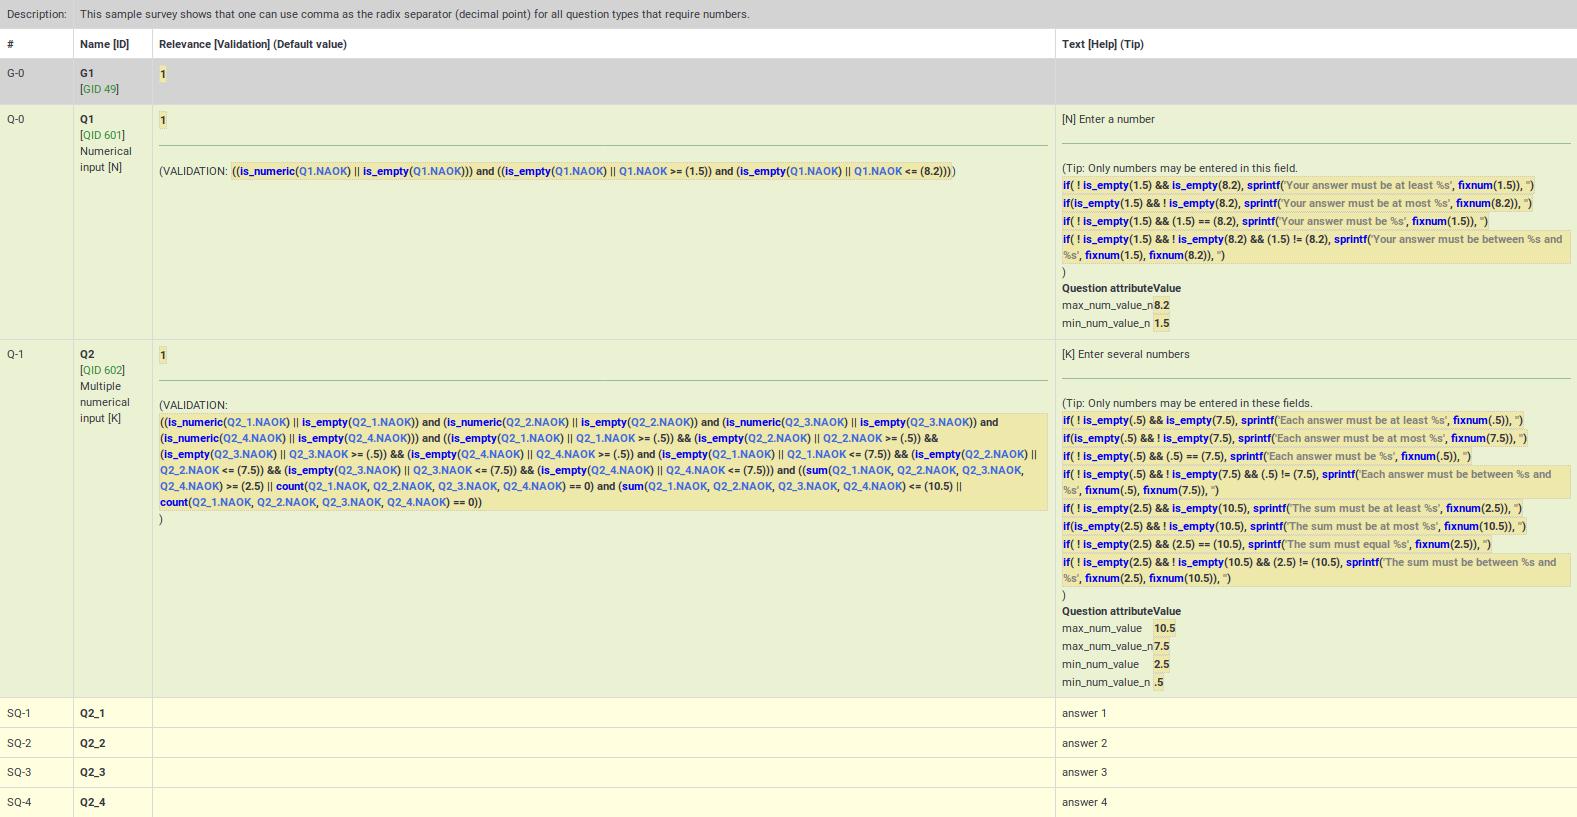
Comma as radix (decimal) separator
Although LimeSurvey fully supports the use of comma as radix (decimal) separator at run-time, you must still use a decimal as the radix separator at the design-time (e.g., when specifying min/max values in advanced question attributes). The working example can be found here.
Also, remember that the validation logic is created for you automatically from the enabled question attributes. The equations may look overwhelming, but you don't need to worry about them.
