Survey settings/hu: Difference between revisions
From LimeSurvey Manual
Maren.fritz (talk | contribs) Created page with "*Áttekintés *Általános beállítások *Felmérés beállításai#Surv..." |
Maren.fritz (talk | contribs) Created page with "A fenti képernyőképen két gomb van kiemelve. A felhasználók a felmérésbeállítások menü méreteinek átrendezésére használhatják őket. Ha át szeretné rendezn..." |
||
| Line 23: | Line 23: | ||
A fenti képernyőképen két gomb van kiemelve. A felhasználók a felmérésbeállítások menü méreteinek átrendezésére használhatják őket. Ha át szeretné rendezni a fő felmérési beállítások menüt, húzza a menü jobb oldalát balra vagy jobbra a '''három pontra''' kattintva. Ha rákattint a '''balra nyílhegyre''', a menü összecsukódik, és kis méretűvé válik, amíg meg nem marad az egyetlen ikonokkal ellátott oldalmenü. A felmérési beállítások menü alapértelmezett nézetéhez való visszatéréshez kattintson a '''jobbra nyíl hegyére''' a felmérés beállításai menü felett. Vigye az egeret az egyes opciók fölé, hogy megnézze, mit csinálnak az egyes ikonok. | |||
<div class="simplebox">[[File:help.png]] '''Note''': The menu can be changed/edited from the [[Menu configuration]] and [[Menu entries configuration]] pages. They can be accessed from the LimeSurvey configuration dialog. '''We recommend that only advanced users edit menus.'''</div> | <div class="simplebox">[[File:help.png]] '''Note''': The menu can be changed/edited from the [[Menu configuration]] and [[Menu entries configuration]] pages. They can be accessed from the LimeSurvey configuration dialog. '''We recommend that only advanced users edit menus.'''</div> | ||
Revision as of 07:57, 9 October 2023
Bevezetés
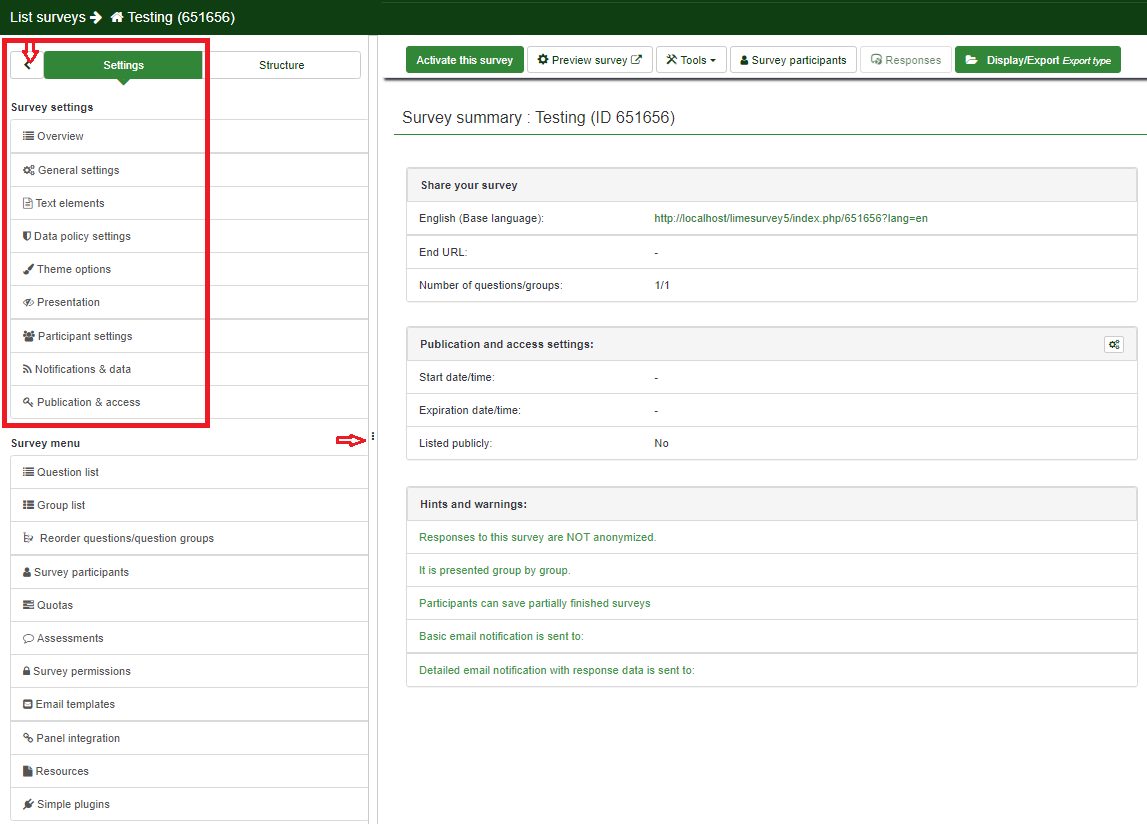
A felmérés beállításai menü lehetővé teszi a felhasználók számára, hogy szerkesztsék a felméréshez kapcsolódó különböző beállításokat. Alapértelmezés szerint a következő felmérési beállítások állnak rendelkezésre:

- Áttekintés
- Általános beállítások
- Szövegelemek
- Adatházirend-beállítások
- Témabeállítások
- Prezentáció
- Résztvevő beállításai
- Értesítések és adatok
- Kiadás és hozzáférés
A fenti képernyőképen két gomb van kiemelve. A felhasználók a felmérésbeállítások menü méreteinek átrendezésére használhatják őket. Ha át szeretné rendezni a fő felmérési beállítások menüt, húzza a menü jobb oldalát balra vagy jobbra a három pontra kattintva. Ha rákattint a balra nyílhegyre, a menü összecsukódik, és kis méretűvé válik, amíg meg nem marad az egyetlen ikonokkal ellátott oldalmenü. A felmérési beállítások menü alapértelmezett nézetéhez való visszatéréshez kattintson a jobbra nyíl hegyére a felmérés beállításai menü felett. Vigye az egeret az egyes opciók fölé, hogy megnézze, mit csinálnak az egyes ikonok.
Overview
The overview page offers an overview of your survey. It is divided in two parts:
- Overview toolbar: The functions from the toolbar allow you to start/stop the survey, check its logic, save & export it, add survey participants, and manually introduce survey participants' data (in the case in which you conduct an offline survey);
- Survey summary: A short summary of your survey.
For a complete description, check the Overview panel wiki page.
General settings
The general settings of a survey allow the user to edit basic survey information, such as the survey owner, administrator's email, and the template used in the survey.
For further details, please continue reading the following wiki page.
Text elements
From the Survey text elements panel, you can edit the title of the survey and its description, welcome and end messages, end URL, and the format of the decimal mark and date.
For more details, access the Survey text elements section.
Data policy settings
The set of options displayed under this option are related to the security text/policy settings. These are the settings that survey participants need to be aware of before completing the survey.
For more details, access our wiki section on data policy settings.
Theme options
This panel is for users who would like to enhance their templates by using the inheritance function and the bootswatch themes.
For more details, access our wiki section on theme options.
Presentation
In this panel you can edit presentation- and navigation-related settings. These changes impact how the survey is presented to survey participants. You can choose to show the number of the questions at the beginning of the survey, a progress bar or the current statistics of the survey once it is completed, and so on.
For a complete description, access the following link.
Participant settings
From this menu you can edit different survey participants table settings. For example, you can choose to anonymize all the responses you get from a survey or allow public survey registration.
For a complete description of the options, access our wiki section on survey participants handling.
Notifications & data
If you would like to save response-related details into the responses tables, access this panel. You can save the referrer URL, IP address, timings, etc. that can help you produce more in-depth analyses. Moreover, LimeSurvey allows you to use the tracking ID from Google Analytics.
For more explanations, read about notifications and data management settings.
Publication & access
This setting allows the survey administrator to choose the way in which the survey can be accessed by the survey participants (e.g., CAPTCHA codes can be used to increase the security of your survey). Moreover, you can also set up from here a start/expiry date/time.
For more details on each option, read from our manual about Publication & access.