Multilingual survey/it: Difference between revisions
From LimeSurvey Manual
Maren.fritz (talk | contribs) Created page with "Per iniziare a tradurre le stringhe, accedi al pannello dell'editor di ciascuna delle tue domande. Puoi osservare nello screenshot qui sotto che tre lingue aggiuntive sono vis..." |
Maren.fritz (talk | contribs) Created page with "<center>File:Sondaggio multilingue - barra delle lingue .png</center>" |
||
| Line 53: | Line 53: | ||
<center>[[File: | <center>[[File:Sondaggio multilingue - barra delle lingue .png]]</center> | ||
Revision as of 08:02, 26 July 2023
Introduzione
LimeSurvey contiene una funzione integrata che consente la traduzione rapida e semplice dei sondaggi. Questa funzione è progettata per facilitare a un traduttore umano la traduzione di un sondaggio dalla lingua di base a qualsiasi lingua di destinazione specificata.
Questa sezione del wiki illustra rapidamente come creare un sondaggio multilingue. La guida tratta argomenti come:
L'esempio analizzato in tutta la sezione wiki può essere scaricato da qui: LS3 sondaggio campione multilingue. Decomprimilo e importa il file .lss nella tua istanza LimeSurvey.
Aggiunta di altre lingue
La lingua predefinita del sondaggio è quella selezionata nel campo della lingua di base. Per impostazione predefinita, è la lingua configurata nelle impostazioni globali della tua istanza.
Per verificare qual è la lingua di base, accedi al pannello delle impostazioni generali del sondaggio e cerca il campo della lingua di base. Nel nostro esempio, la lingua di base è "Inglese". Per iniziare ad aggiungere nuove lingue in cui desideri tradurre il sondaggio, consulta il campo Lingue aggiuntive. Nel nostro esempio sono state selezionate altre tre lingue: francese, tedesco e italiano.
Una volta fatto, non dimenticare di cliccare sul pulsante "Salva" situato nella parte in alto a destra dello schermo.
Ora, se controlli la barra degli strumenti in alto, puoi osservare che una piccola freccia è apparsa accanto a "Anteprima sondaggio". Ciò significa che il sondaggio può essere visualizzato in anteprima in diverse lingue:
Se accedi al pannello panoramica, vengono visualizzati quattro link di indagine aggiuntivi. Corrispondono alle lingue aggiunte di recente:
Traduzione di stringhe
Per iniziare a tradurre le stringhe, accedi al pannello dell'editor di ciascuna delle tue domande. Puoi osservare nello screenshot qui sotto che tre lingue aggiuntive sono visualizzate sopra il campo del codice della domanda:
Click on any of them and start translating the question field.
The same type of "language bar" is located in many other places such as in the text elements and data policy settings panels, answer and subquestion text fields, and so on. However, translating fields using this method can get tricky if your survey is long and you wish not to miss anything. That is why we heavily recommend our users to use the quick translation tool. To access it, click on any survey-related setting (such as "Overview") -> Tools -> Quick-translation
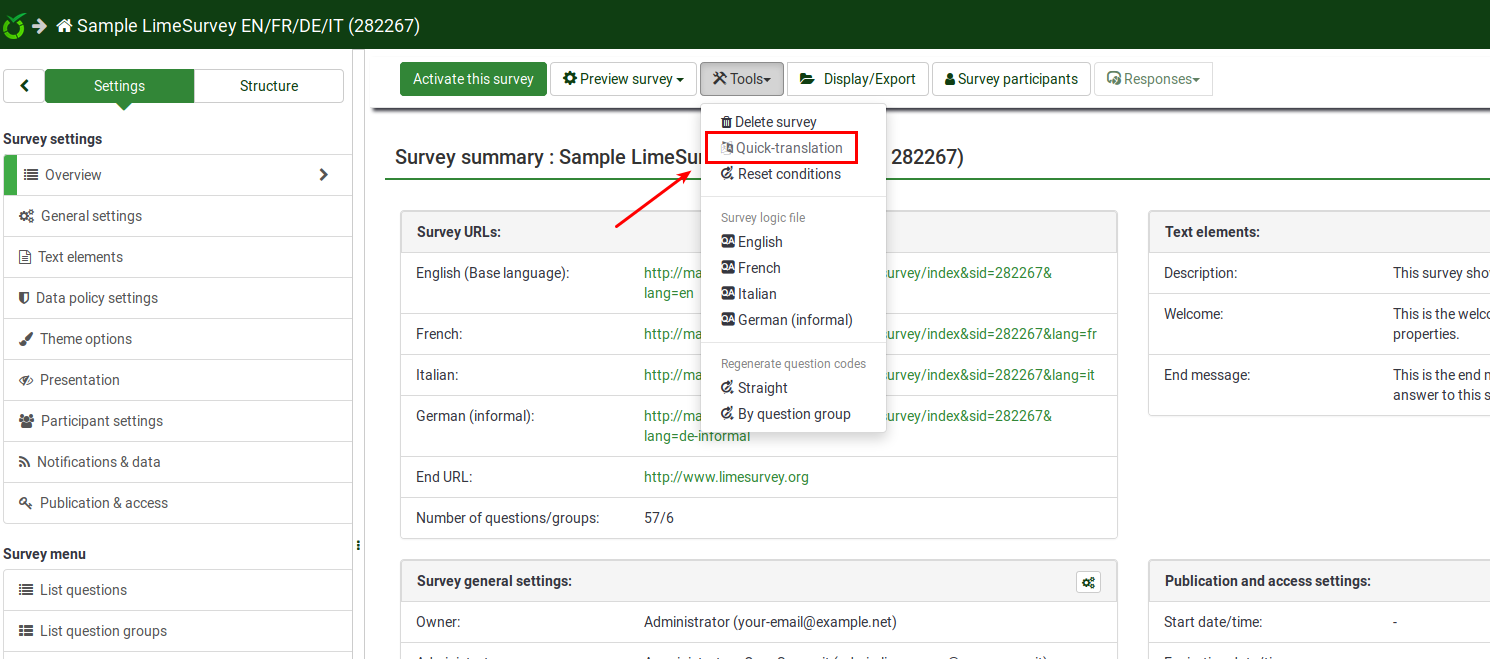
Quick-translation tool
The quick-translation tool has been specifically designed for those that work with multilingual surveys. Once accessed, the following panel will be loaded:
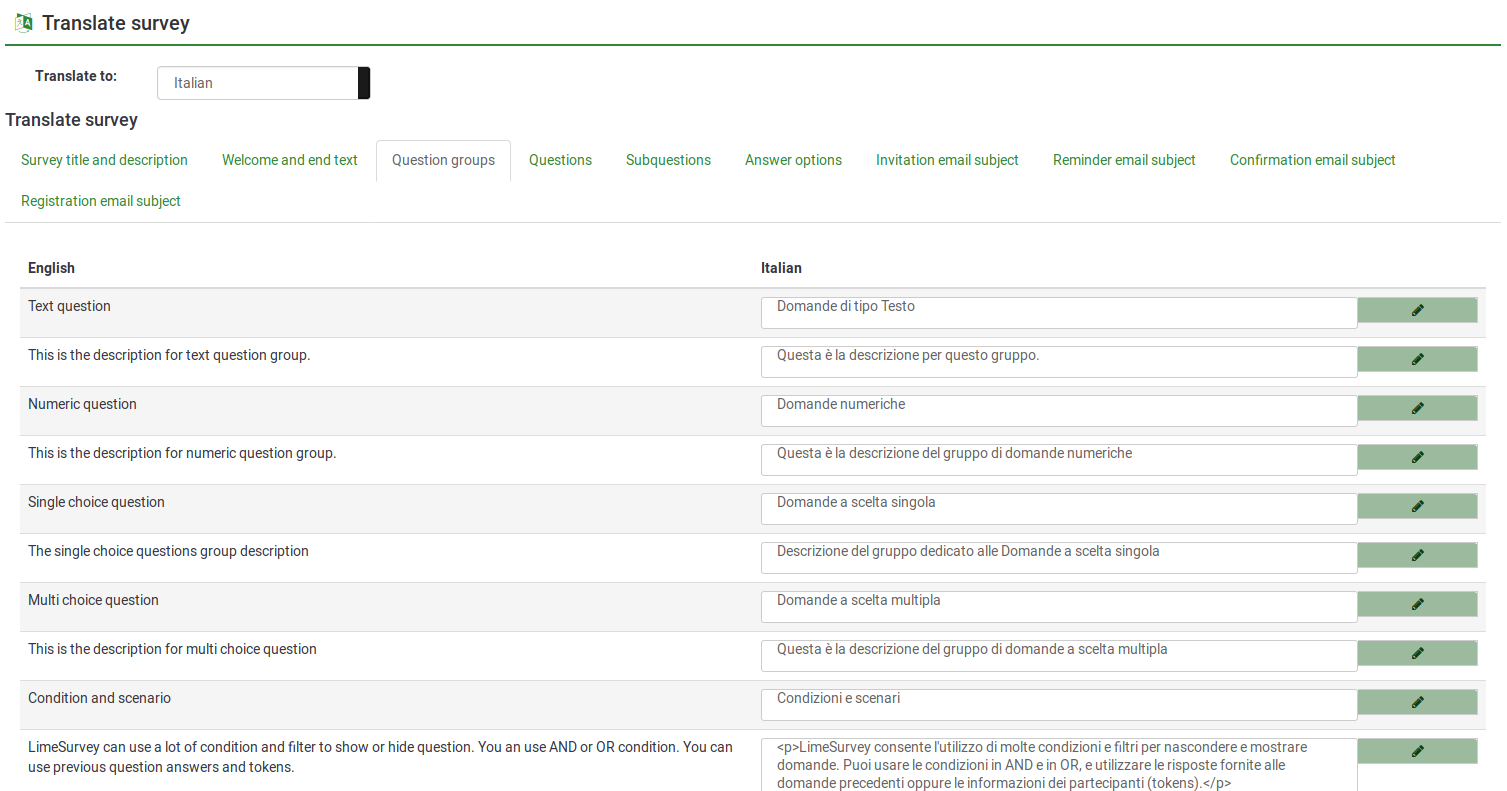
The first option, translate to, gives you the possibility to select the language you wish to translate into from your base language.
The next options refer to the translation of your survey content. They refer to:
- Survey title and description
- Welcome and end texts
- Question groups
- Questions
- Subquestions
- Answer options
- Invitation email subject
- Reminder email subject
- Confirmation email subject
- Registration email subject
Once you are done translating these fields, do not forget to click on the "Save" button located in the upper right part of the panel.
Multilingual survey overview
To check your work, use the preview button. The welcome page will look like this:
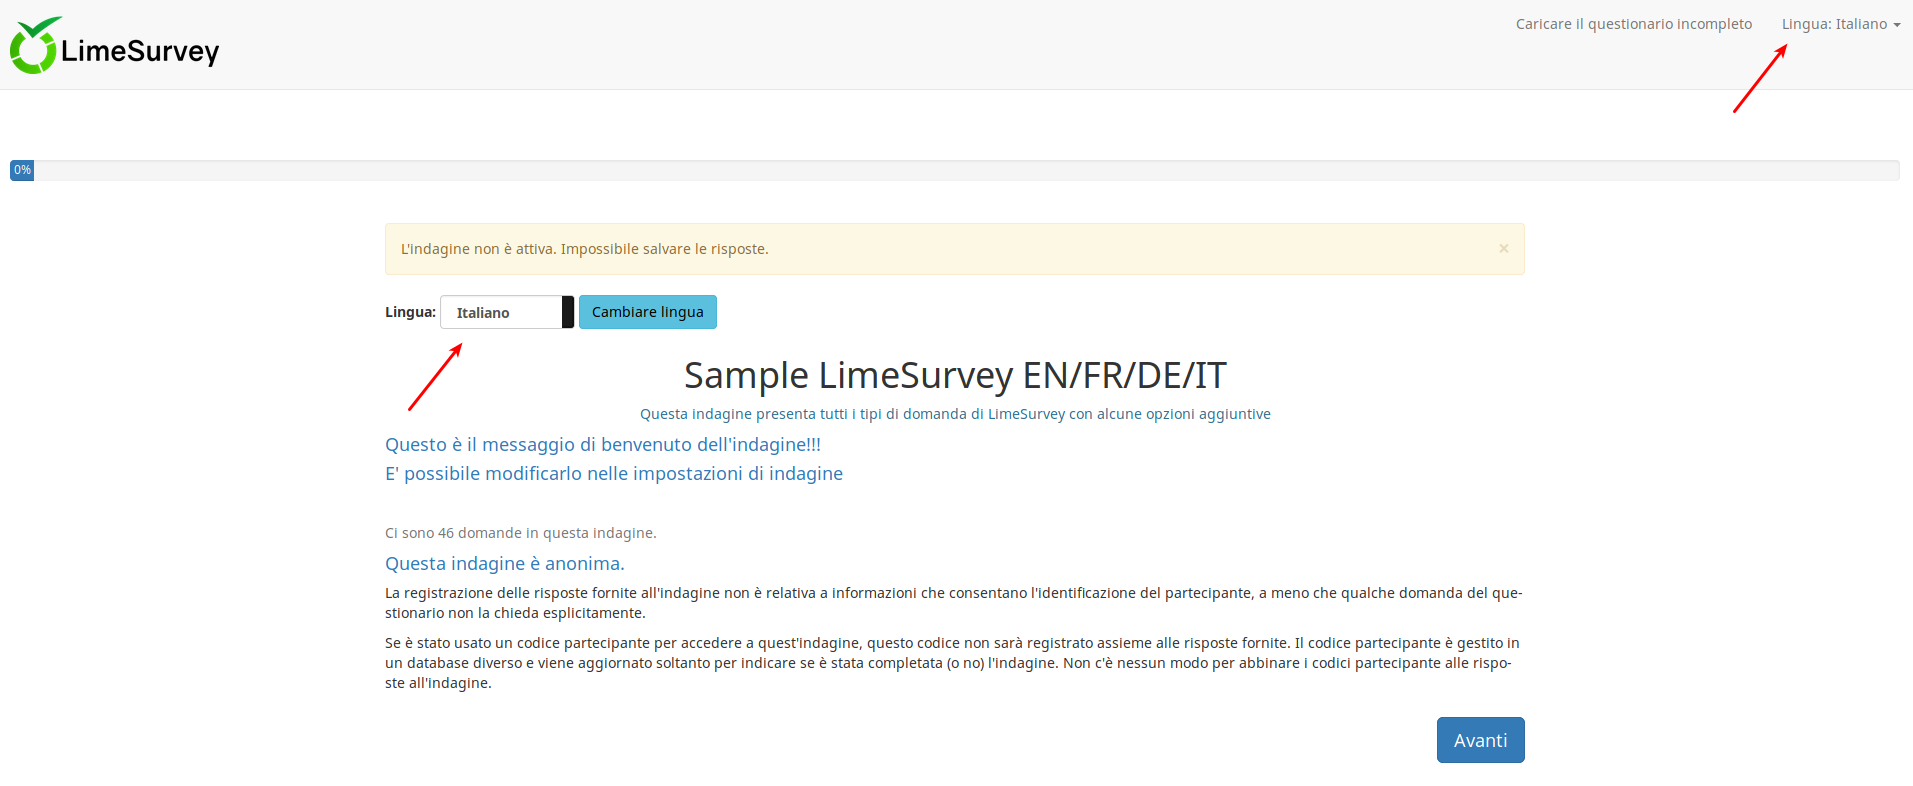
Two language switcher can be observed once the welcome page is loaded. LimeSurvey offers the possibility to your respondents to change the language of instructions even though you shared with them the corresponding link for a specific language. A language switcher will also be located on the top right-side of your survey.
In the case in which you wish to hide the two "language switcher" buttons, edit the theme of your survey. For more details, see the hints & tips wiki subsection.
Hints & tips
- If you wish to grant users translation permissions to access the quick-translation tool, check the following wiki subsection.
- The "Auto-translate" feature makes use of the Google translate web service for automatic translation of a survey. You must enter your Google Translate API Key under global settings to access this feature. Google currently charges $20 US per 1 million characters submitted for translation.
How to hide the language switcher from the welcome page
In the case in which you decide to launch a multilingual survey, you will observe on the welcome page a drop-down menu that permits your respondents to select the language in which they wish to fill in your survey:

However, in certain scenarios you wish to hide the respective option. There are many ways in which you can hide the language switcher. The "twig" way is displayed below.
Access Themes from the global Configuration menu:

Click on the Theme editor button to edit the desired theme:
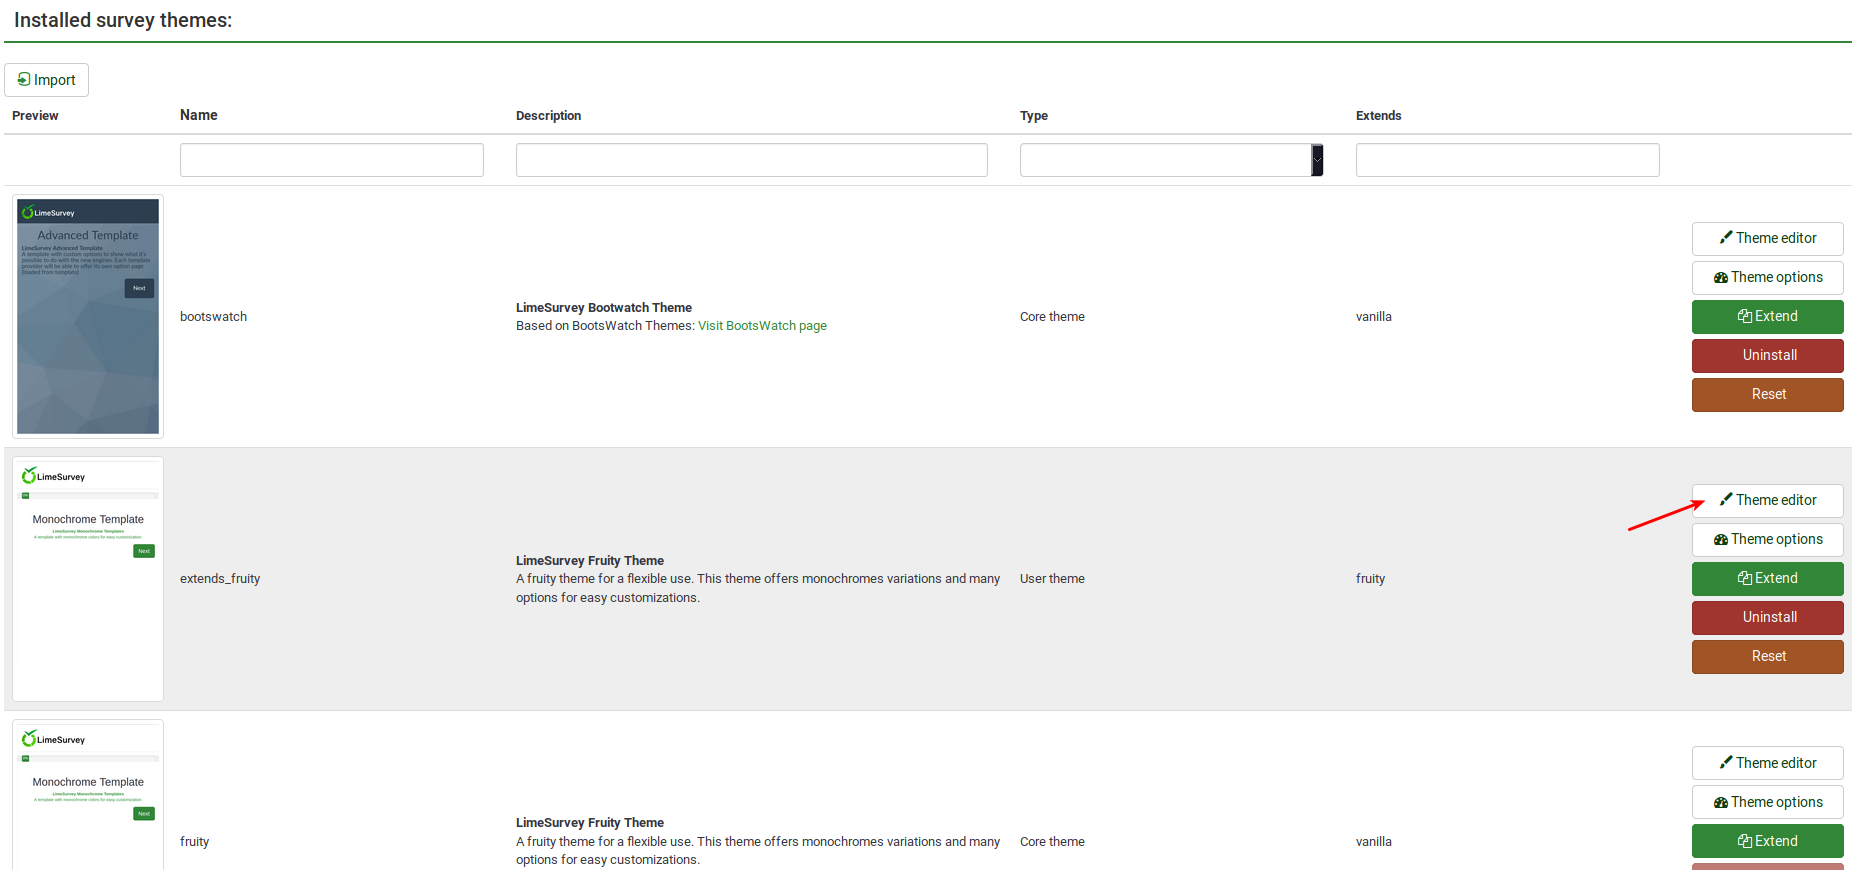
Look on the left side of the screen for the language_changer.twig file.
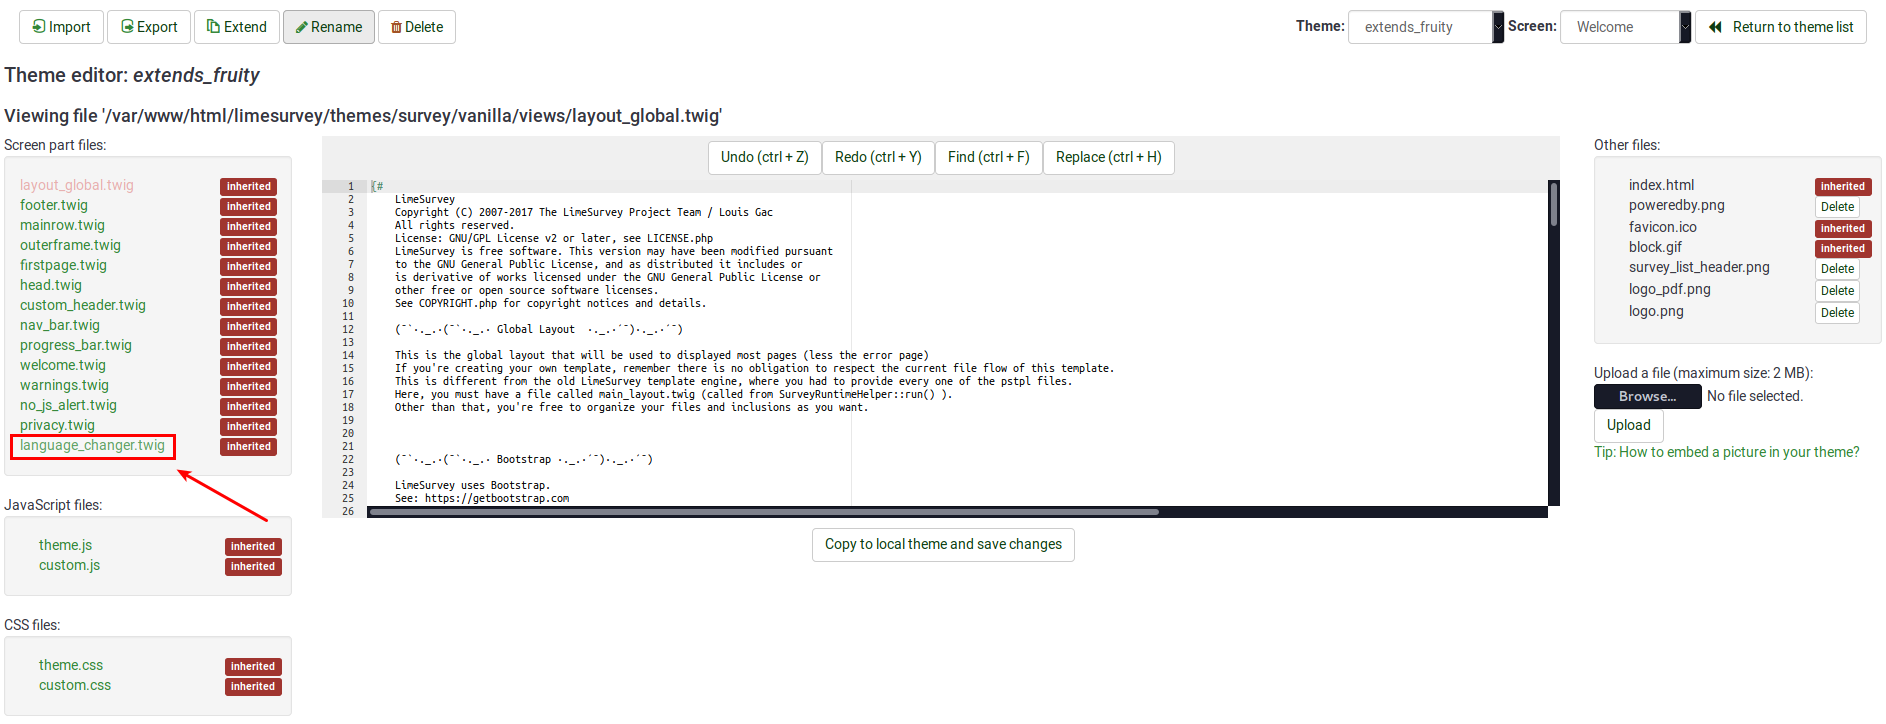
Go to the line that contains the following function:
{% if aSurveyInfo.alanguageChanger.show == true %}
Comment it out (replace "%" with "#") and copy the following line below it:
{% if false == true %}
The line should look like this in the end:

Click on "Copy to local theme and save changes".
Access your survey and select the edited theme from the general settings panel. Now, the welcome page should look like this:

To hide the top language switcher, we will follow pretty much the same steps as described above. We just have to access the right twig file to edit it. Access again the theme you wish to change, and then go to Screen which is located in the upper-right part of the window and select Navigation from the dropdown list. Now, look on the left side of the window for "language_changer_top_menu.twig". Click on it and comment out:
{% if aSurveyInfo.alanguageChanger.show == true %}
Add the following line below it:
{% if false == true %}
No language switcher will be displayed on the right side of the screen:
